About this Page
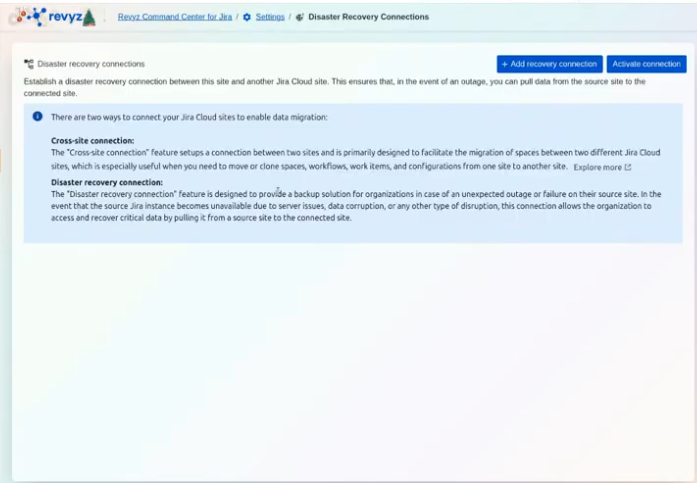
This feature allows you to establish a secure disaster recovery connection between this site and another Jira Cloud site. This ensures that, in the event of an outage, you can pull data from the source site to the connected site.
What is the Use Case?
This is for emergency use only, such as when your primary source site is inaccessible. You activate this connection to recover critical data by pulling it from the inaccessible source site to your pre-configured standby (destination) site.
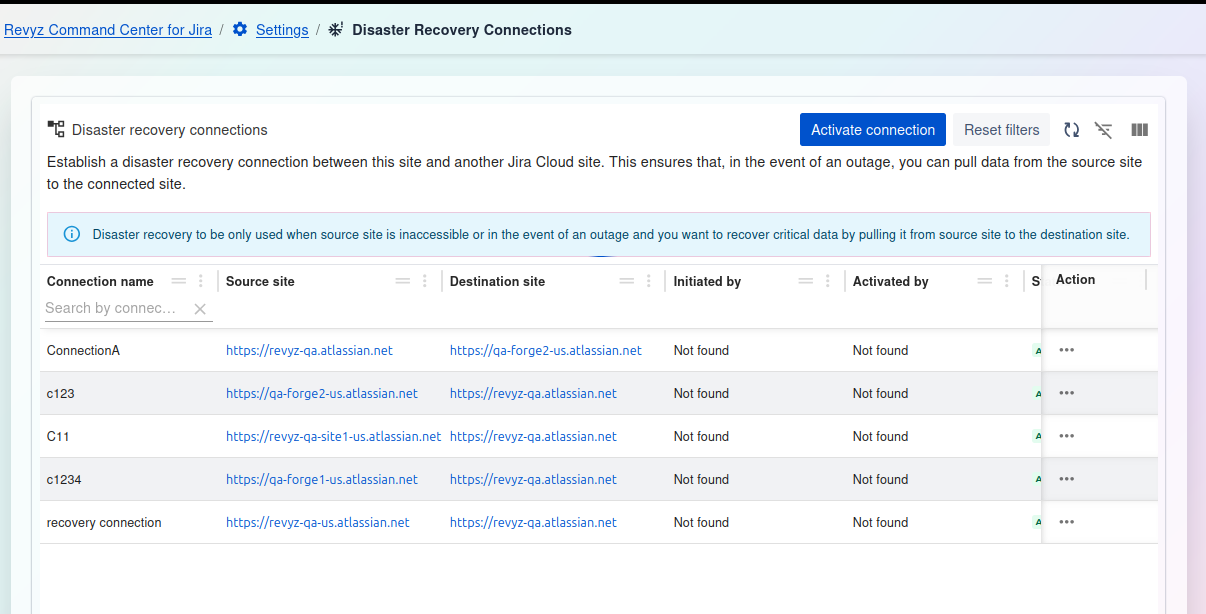
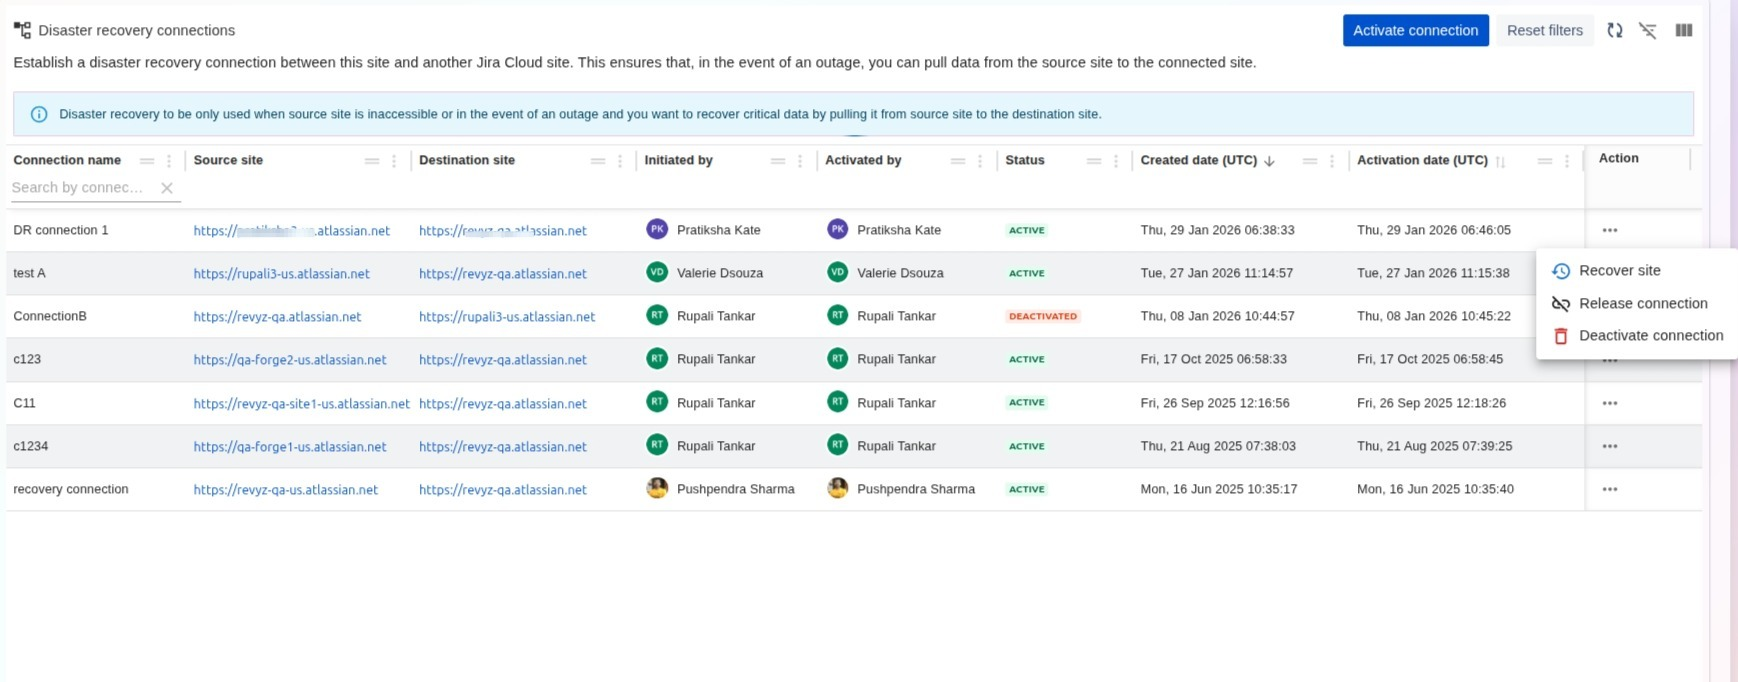
Disaster recovery connections dashboard
This feature is applicable to:
command center for jira config manager for jira assets data manager for jira
Step 1: Management and Filtering
-
Activate connection: This is the primary action in an emergency. Select a connection and click this button to initiate the data pull from the source to the destination.
-
Reset filters: Clears any filters you have applied to the connection list (e.g., on the "Connection name" field, which is scrolled out of view).
-
Table tools (right side): Use these icons to toggle the filter row, customize the visible columns, or enter a full-screen view.
Connections Table
The main table provides a detailed list of all configured disaster recovery connections.
-
Connection name: (Scrolled out of view, but present) The unique name given to the DR connection.
-
Source site: (Scrolled out of view, but present) The URL of the primary Jira instance where the data originates.
-
Destination site: The URL of the standby or "recovery" Jira instance where the data will be pulled to.
-
Initiated by: The user who originally set up the connection (appears as "Not found" if the user is no longer available).
-
Activated by: The user who last activated the connection during a DR event (appears as "Not found" if the user is no longer available).
-
Status: (Column scrolled, but indicated by green "A") The current state of the connection (e.g.,
ACTIVE). -
Action: A "..." menu that provides additional options, such as editing or deleting the connection configuration.
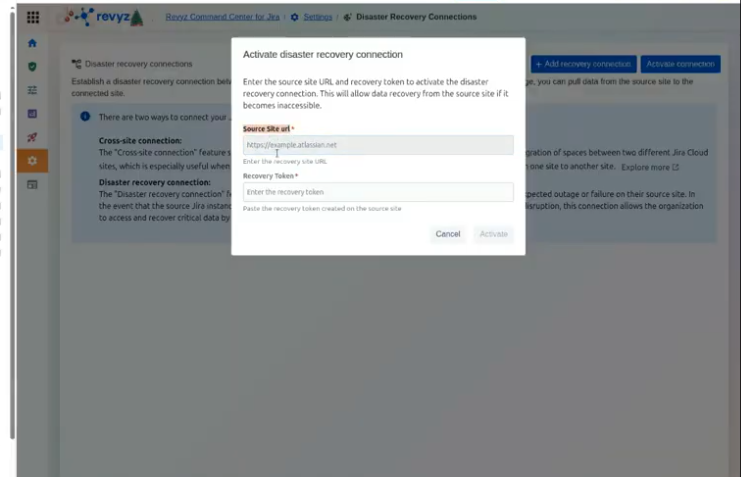
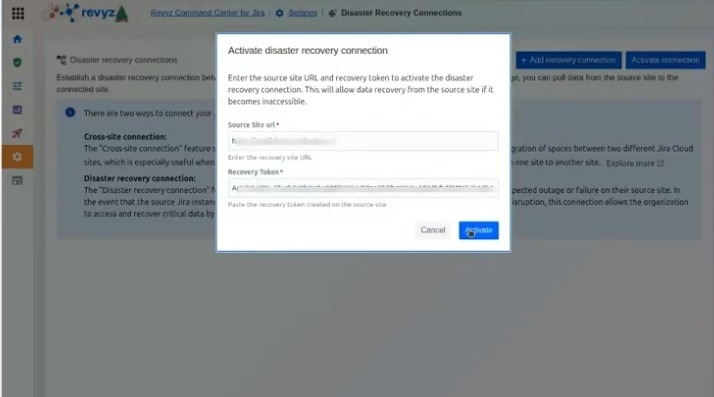
Step 2: Activating a Disaster Recovery Connection

To establish a link between your current site and the source site for data recovery purposes, follow these steps:
-
Open the Activation Window: From the Disaster Recovery Connections dashboard, click the Activate connection button.
-
Enter Source Site URL: In the first field, input the full URL of the Atlassian site you wish to recover data from (e.g.,
https://example.atlassian.net). -
Input Recovery Token: Paste the unique Recovery Token in the second field.
-
Note: This token must be generated on the Source Site prior to this step. Ensure the token has not expired.
-
-
Confirm Activation: Once both fields are filled correctly, the Activate button will turn blue. Click it to finalize the connection.
Disaster Recovery Setup
A proactive setup is a mandatory step to ensure the Disaster Recovery feature works when a disaster occurs.
1. Proactive Setup (Before an Outage)
Establishing a connection before an emergency occurs is highly recommended to minimize downtime.
Step 1: Access Settings
-
Log into the Revyz Command Center for Jira.
-
Navigate to Settings and then select Disaster Recovery Connections.
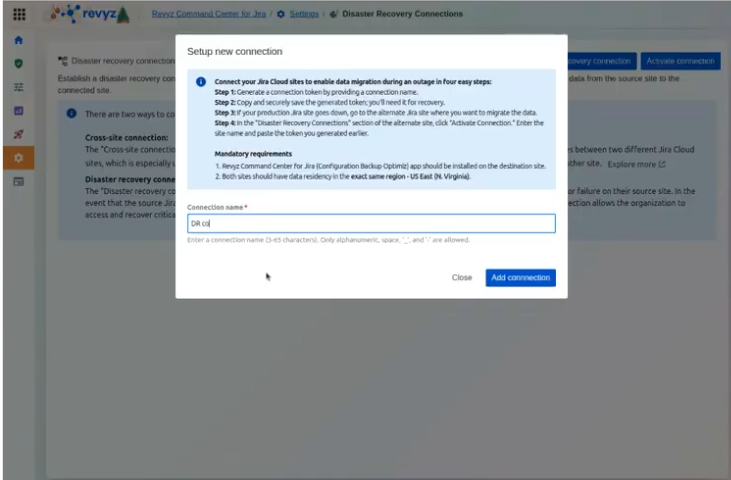
Step 2: Generate a Connection Token
-
Click + Add recovery connection.
-
Enter a Connection name (3–65 characters; alphanumeric, spaces,
_, or-are allowed). -
Click Add connection to generate your unique recovery token.
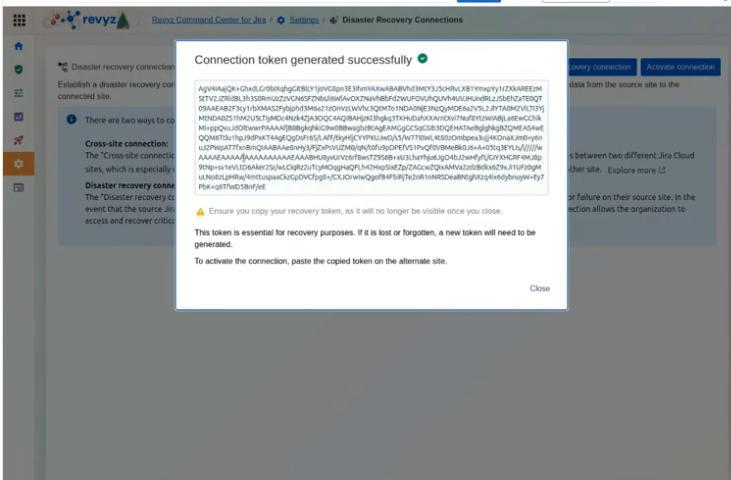
Step 3: Secure Your Token
-
Copy the token immediately.
-
Crucial: This token will no longer be accessible once you close the window.
-
Store the token in a secure location (e.g., a password manager) according to your organization's security policies.
2. Activating the Connection
Option A: Immediate Setup (Recommended)

If you have a standby site ready, navigate to that site’s Revyz app, click Activate connection, and enter the Source Site URL and the Recovery Token.
Option B: Activation During an Outage
If you do not have a fallback site ready, store the token safely. You will perform the activation steps below on your fallback site only when a disaster occurs.
To Activate:
-
On the standby/fallback site, navigate to Disaster Recovery Connections.
-
Click Activate connection.
-
Provide the Source Site URL (the URL of the affected site) and paste the Recovery Token.
-
Click Activate.
3. Mandatory Security Verification
To protect your data from unauthorized access, a proactive connection is not immediately usable for recovery.
Verfication process
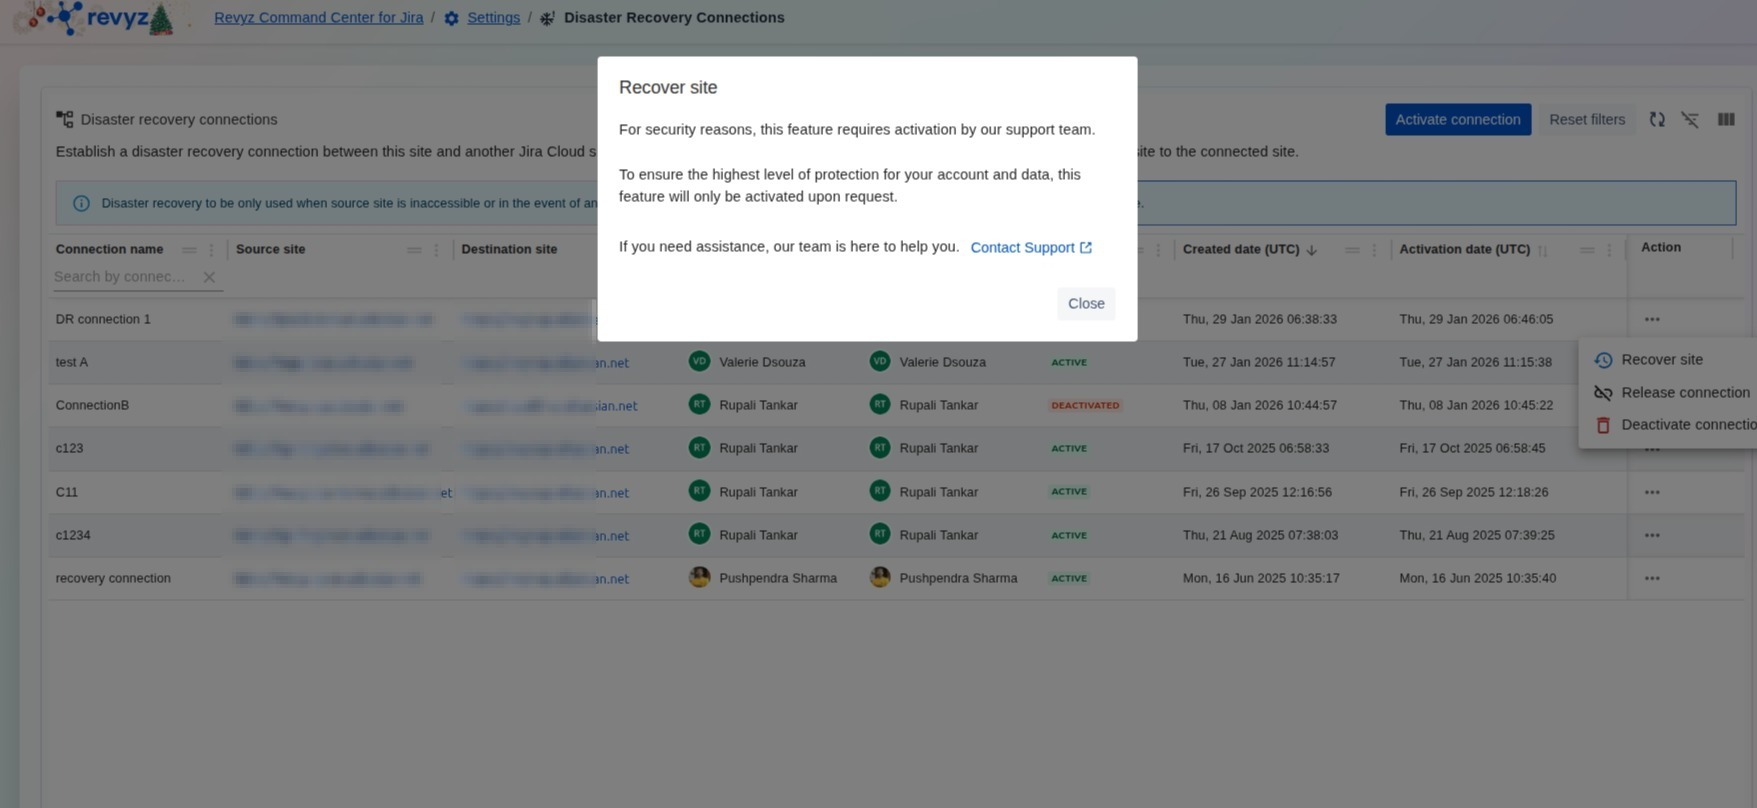
To protect your data from unauthorized access, a proactive connection is not immediately usable for recovery.
-
Support Activation Required: For security, the "Recover site" feature must be manually enabled by the Revyz support team.
-
Verification Process: Once the connection is established and active, you must Contact Support.
-
Checks: The support team will verify email addresses and other details to ensure the recovery request is legitimate before unlocking the feature.
Steps to take when the site is down.
For details on how to recover the site, refer: https://support.revyz.io/revyz-data-manager/disaster-recovery