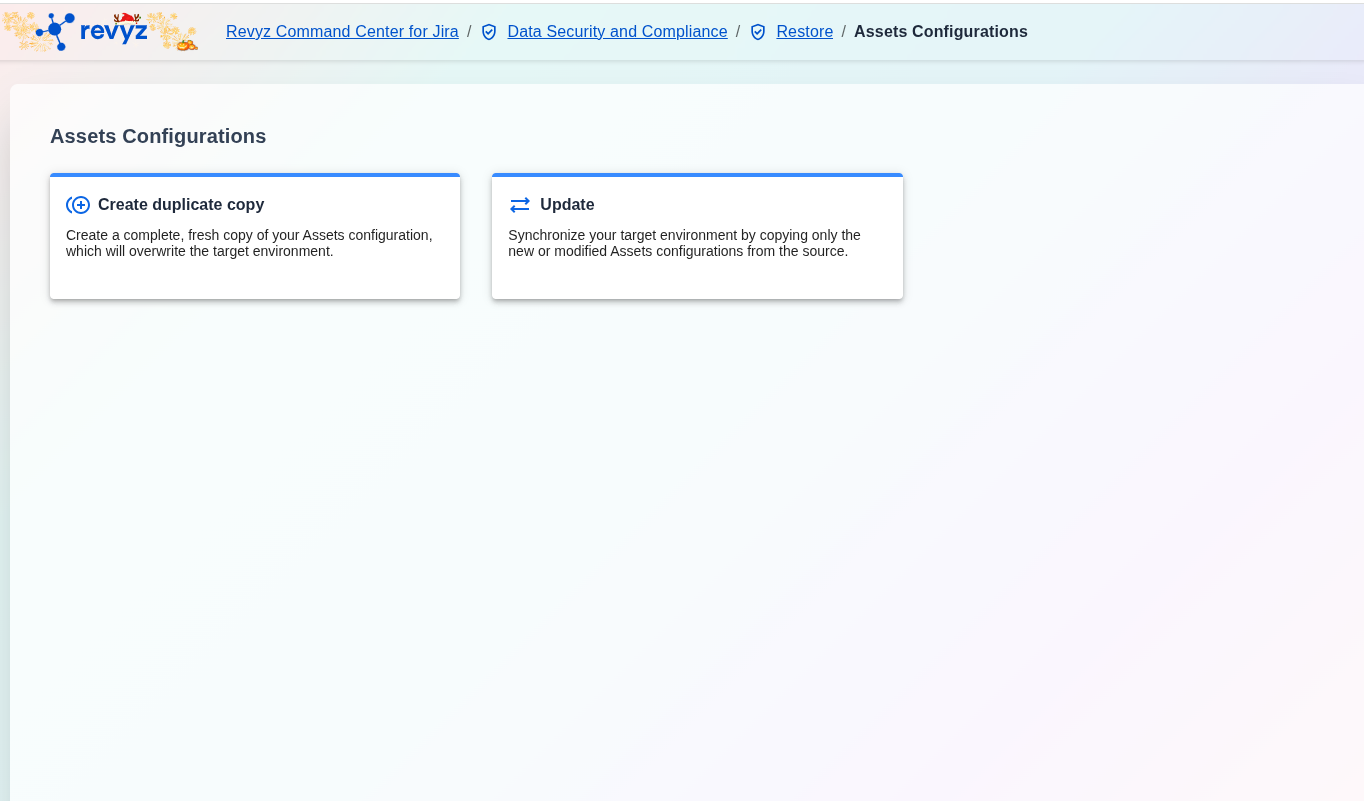
About this Page
This page is the starting point for managing the transfer or synchronization of Jira Assets configuration data (e.g., schemas, object types, attributes, references, etc.) between Jira environments. It provides two distinct methods for deployment and maintenance of these configurations:
What is the use case?
This feature is the starting point for managing the transfer or synchronization of Jira Assets configuration data (e.g., schemas, object types, attributes, references, etc.) between Jira environments. It provides two distinct methods for deployment and maintenance:
-
Create a Fresh Copy: Overwrite a target environment by creating a complete, fresh copy of your Jira Assets configurations.
-
Update and Synchronize: Maintain a target environment by copying only modified or updated configurations to keep environments in sync.
This feature is applicable to
command Center for jira assets data manager for jira
What is Restore Assets Configurations?
With this feature, you can replicate assets objects, schemas, and configurations.
How to Clone Assets Configurations (Create Duplicate Copy)
This feature is applicable to
command Center for jira assets data manager for jira *Advanced
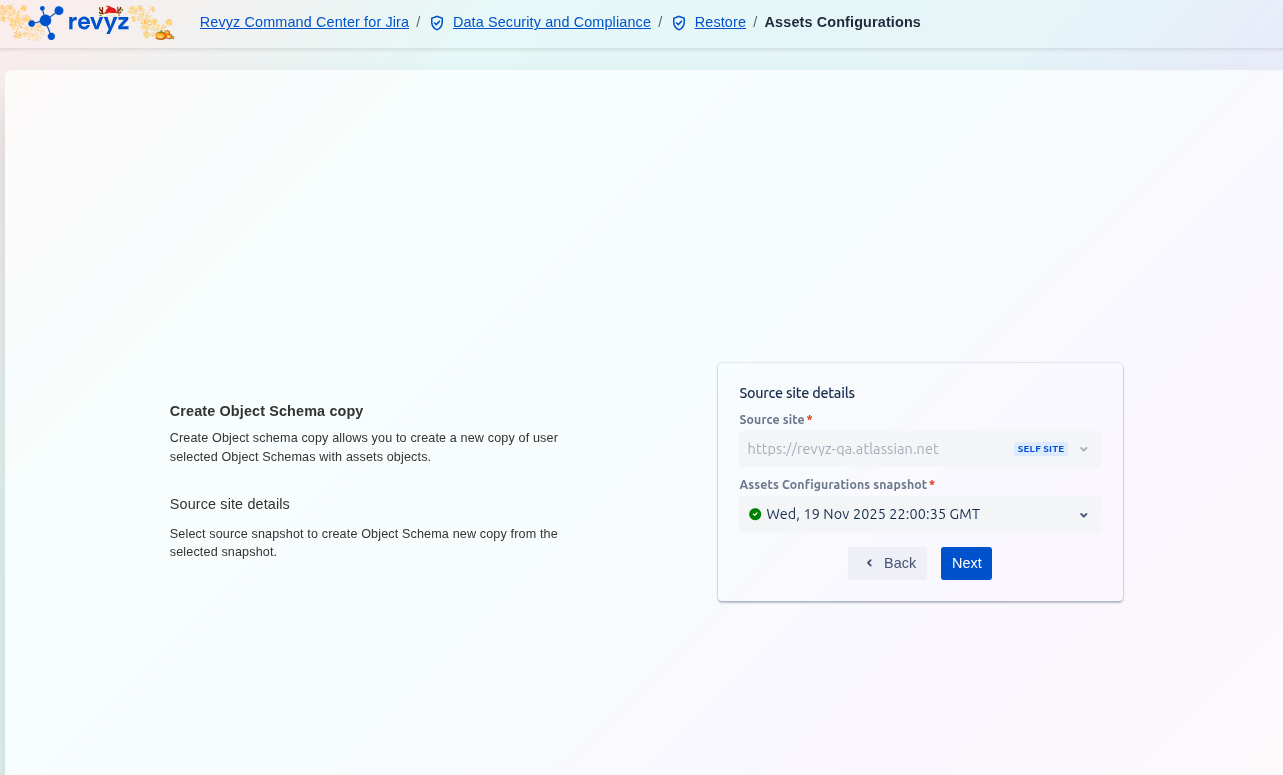
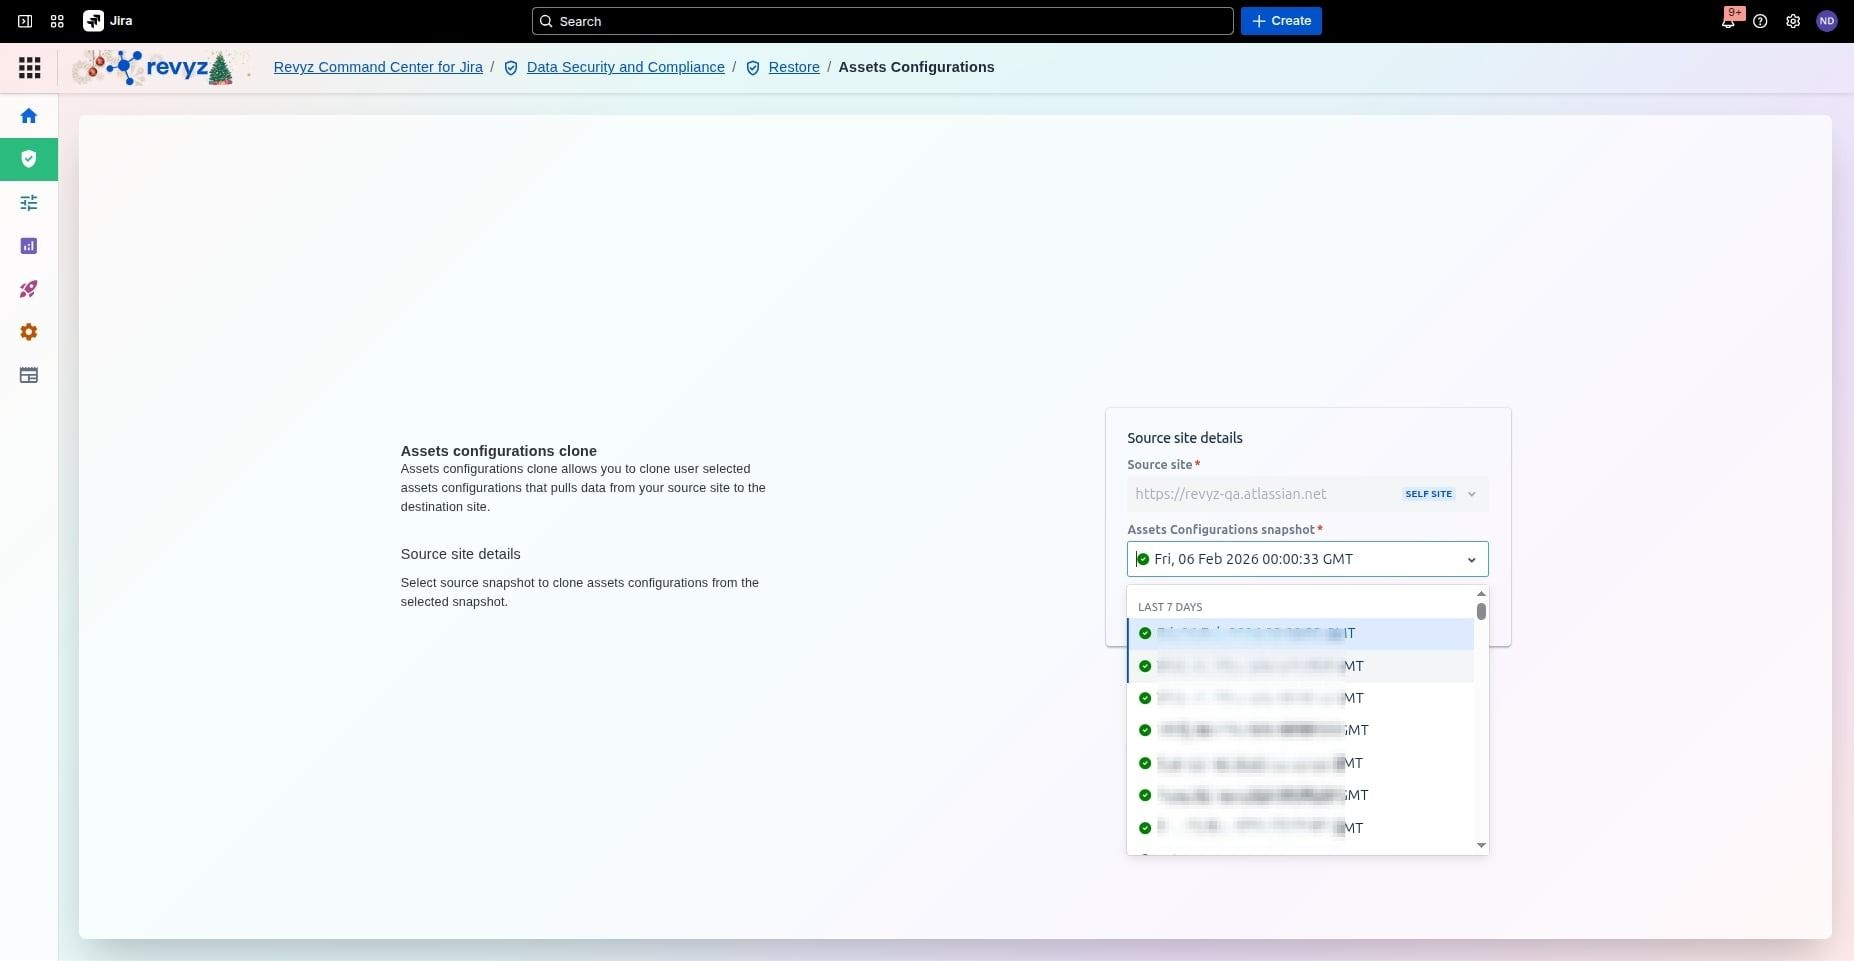
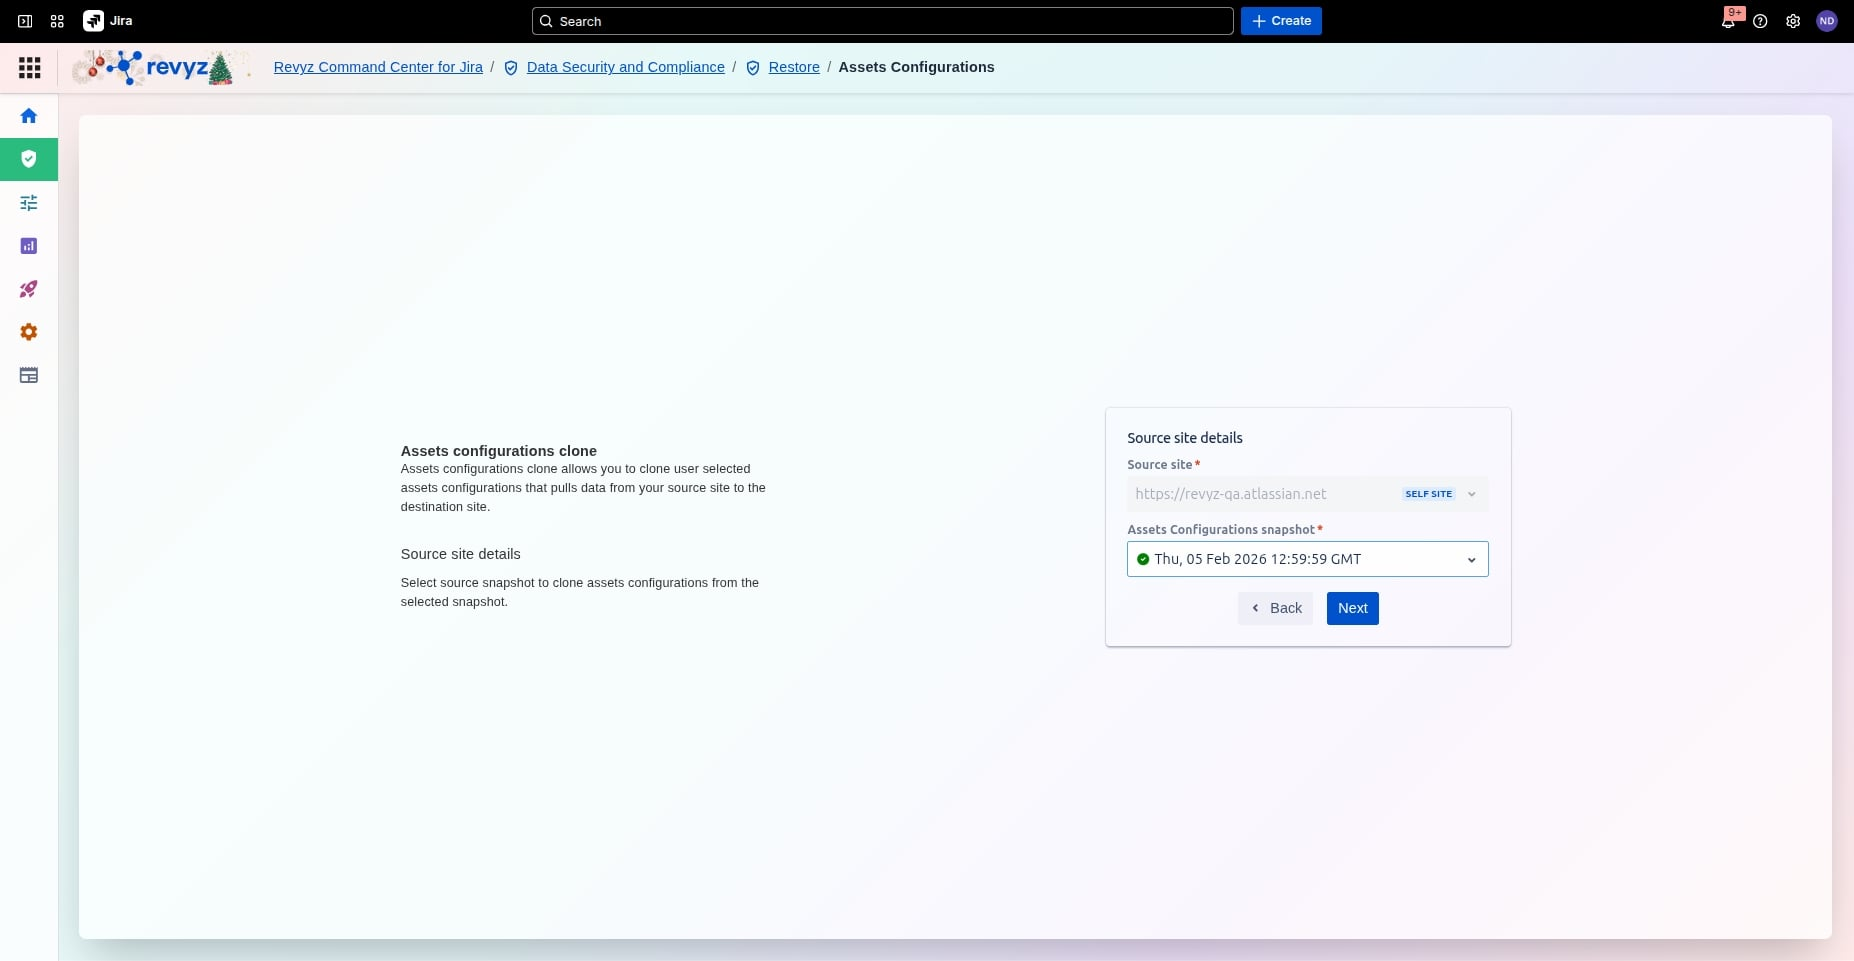
Step 1: Select Source Site Details
-
Define the Source site by selecting the Jira instance that contains the configurations you wish to clone.
-
Select the Configuration snapshot—a specific point-in-time backup that holds the Assets configurations you want to use.
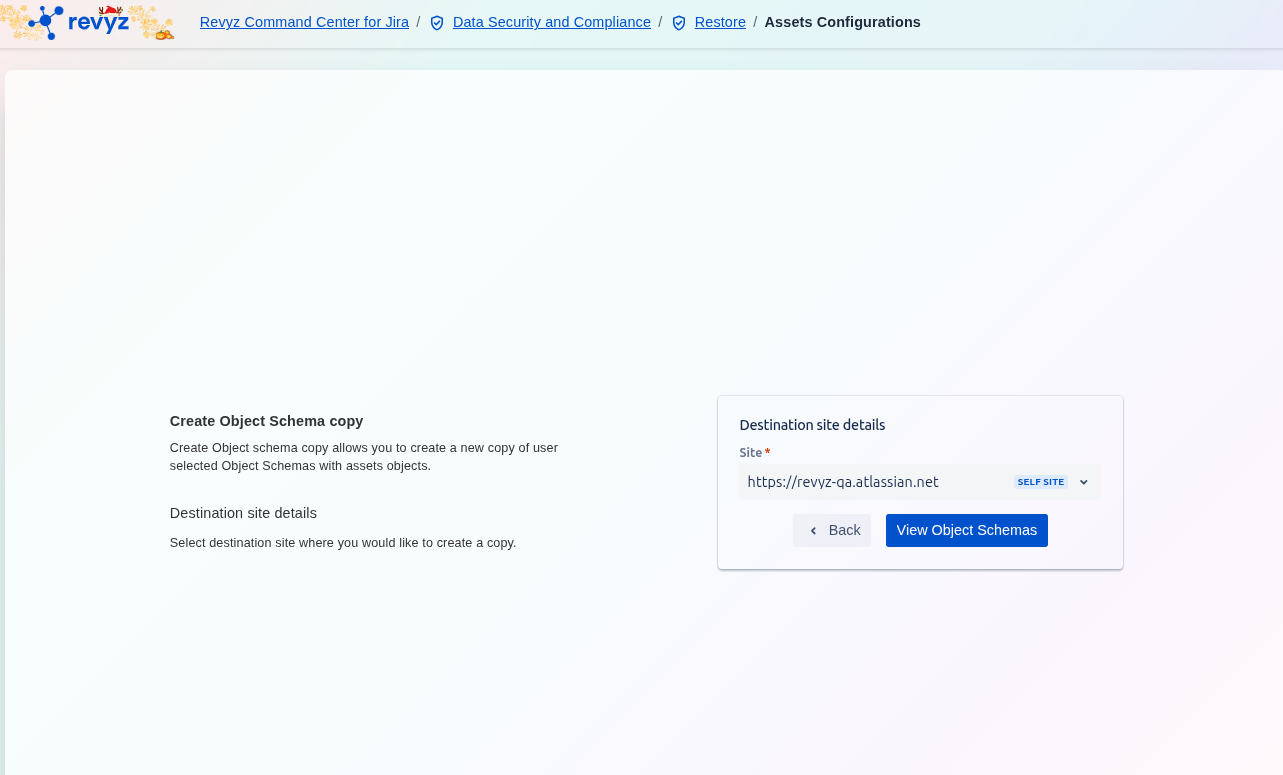
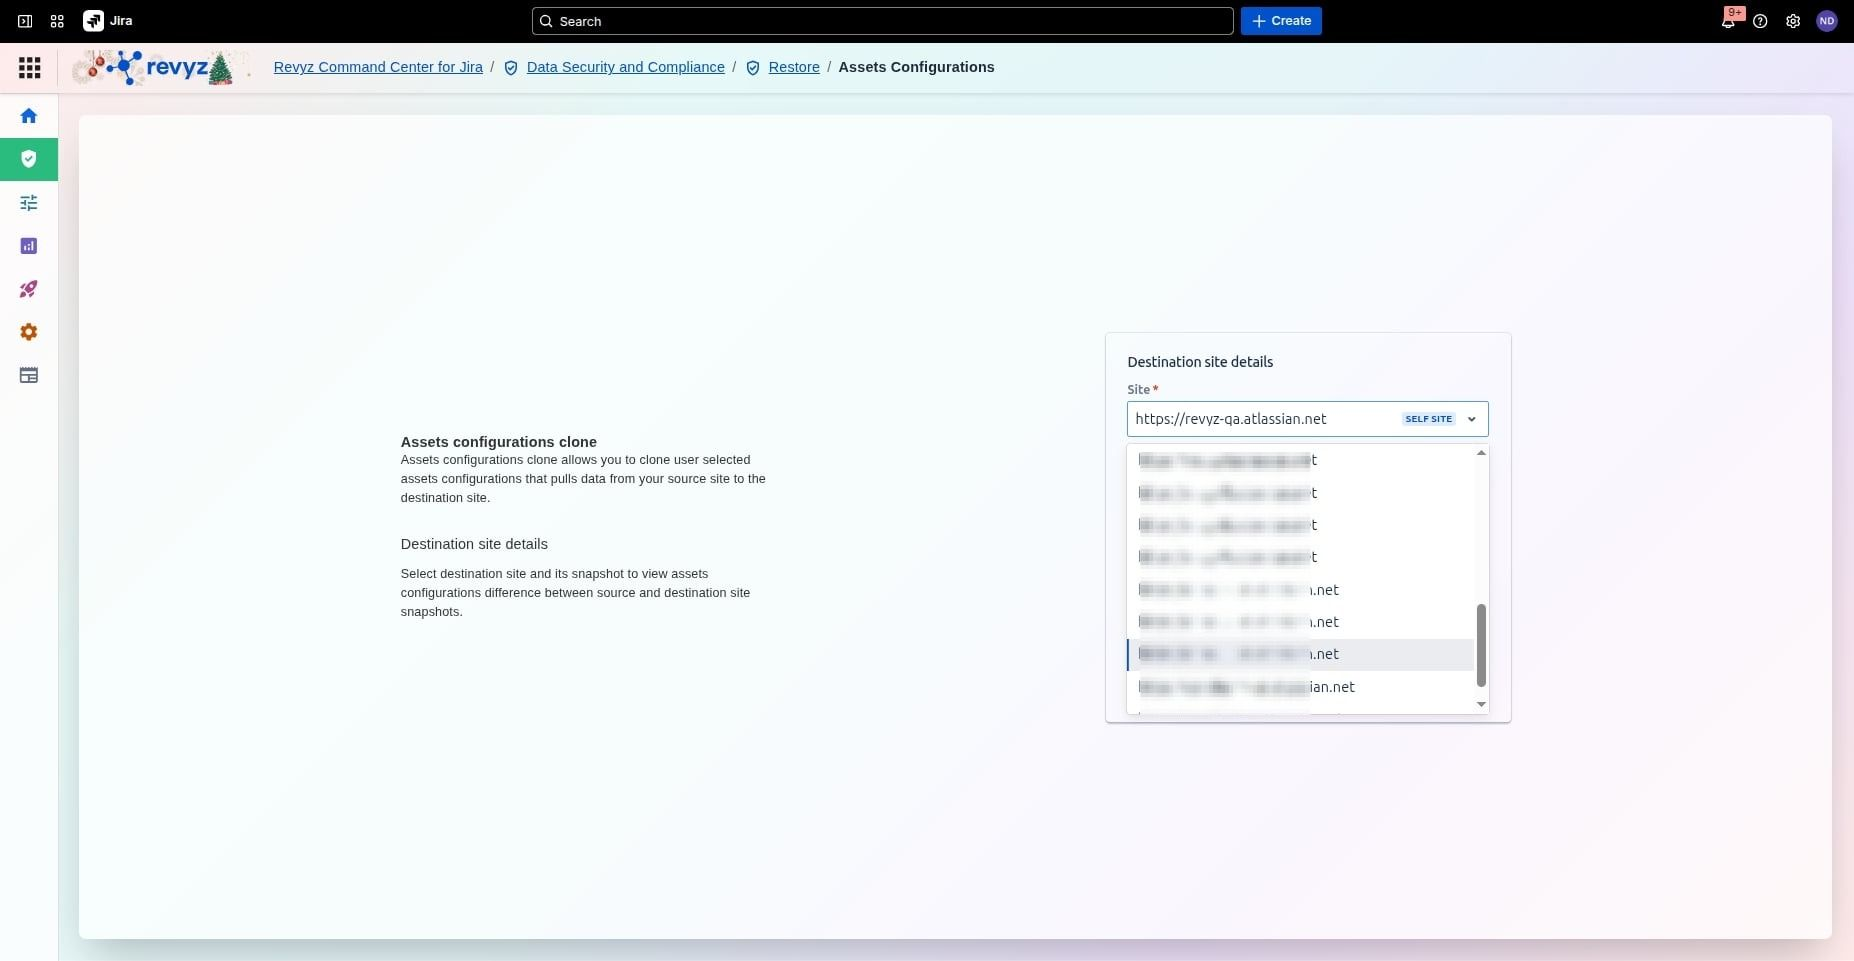
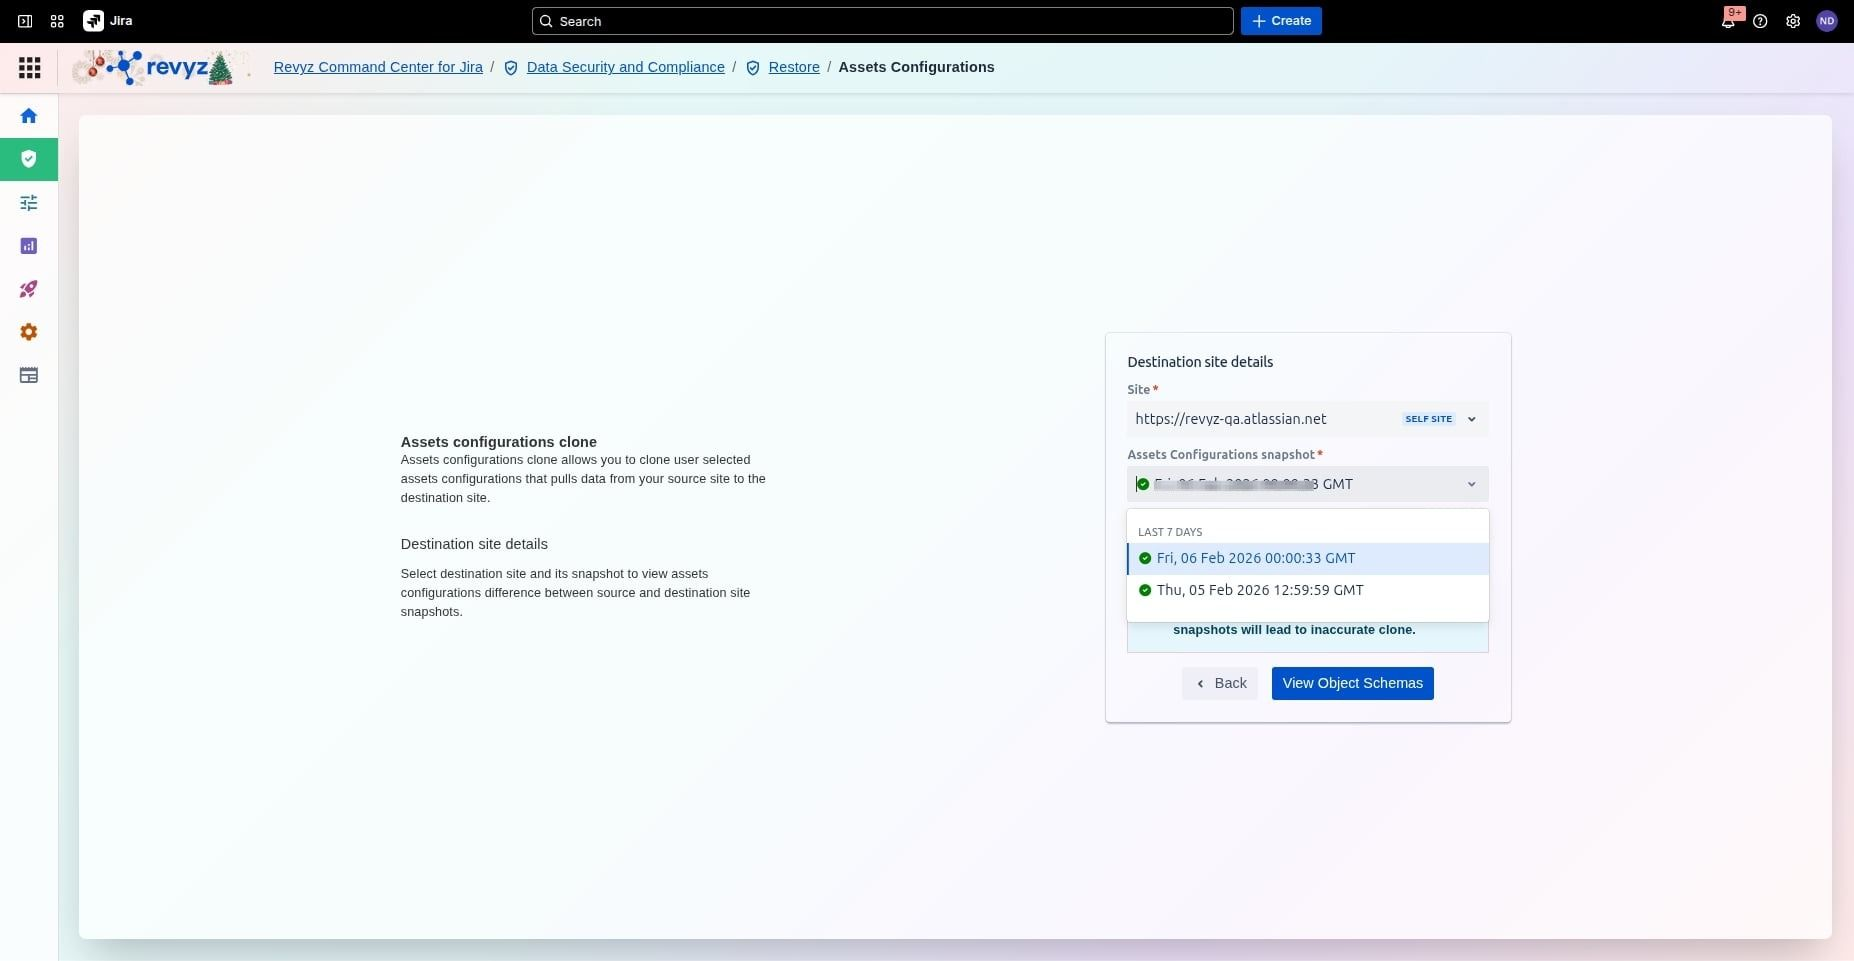
Step 2: Select Destination Site
-
Select the Destination site where the cloned configurations will be deployed.
-
Select the Configuration snapshot for the destination site.
-
Click on “View Object Schemas” to proceed to the comparison step.
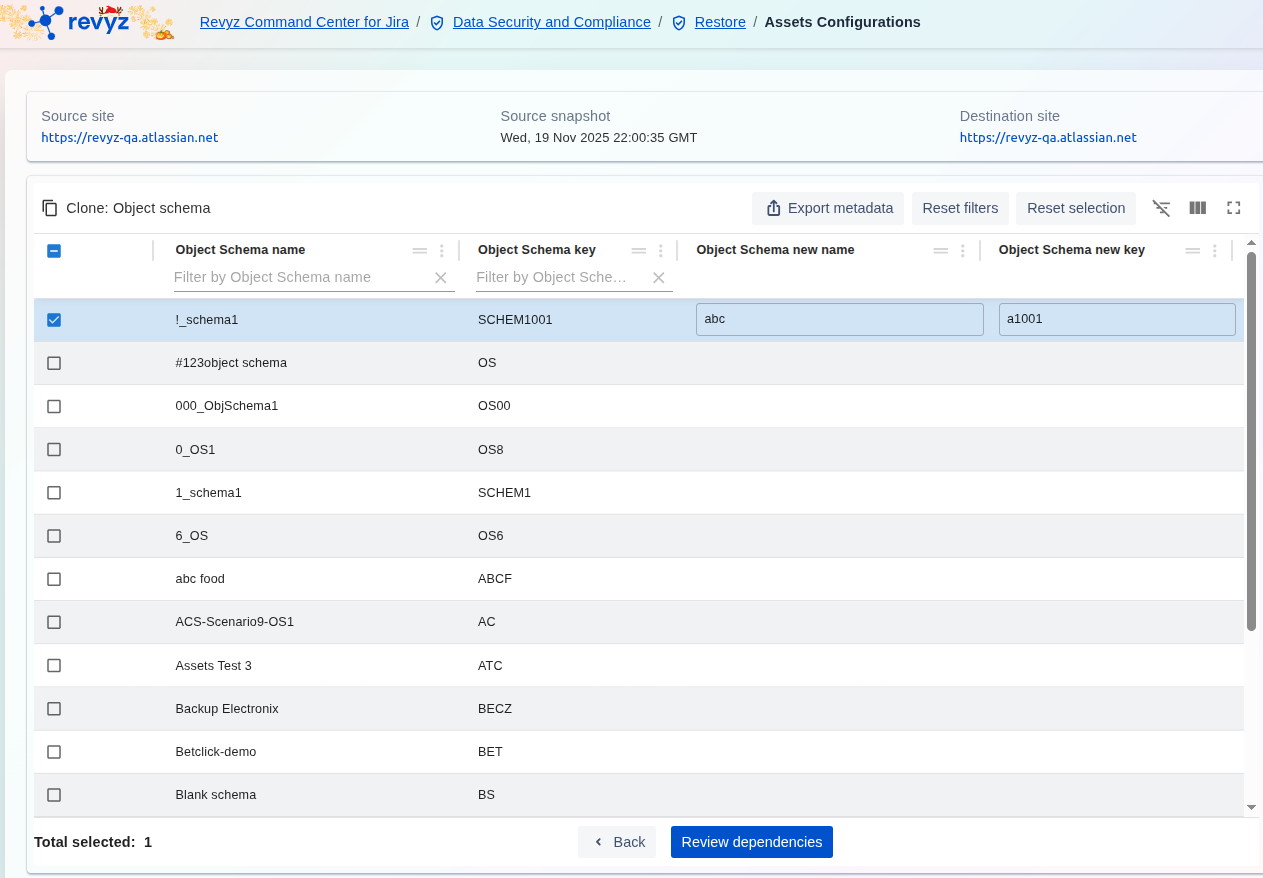
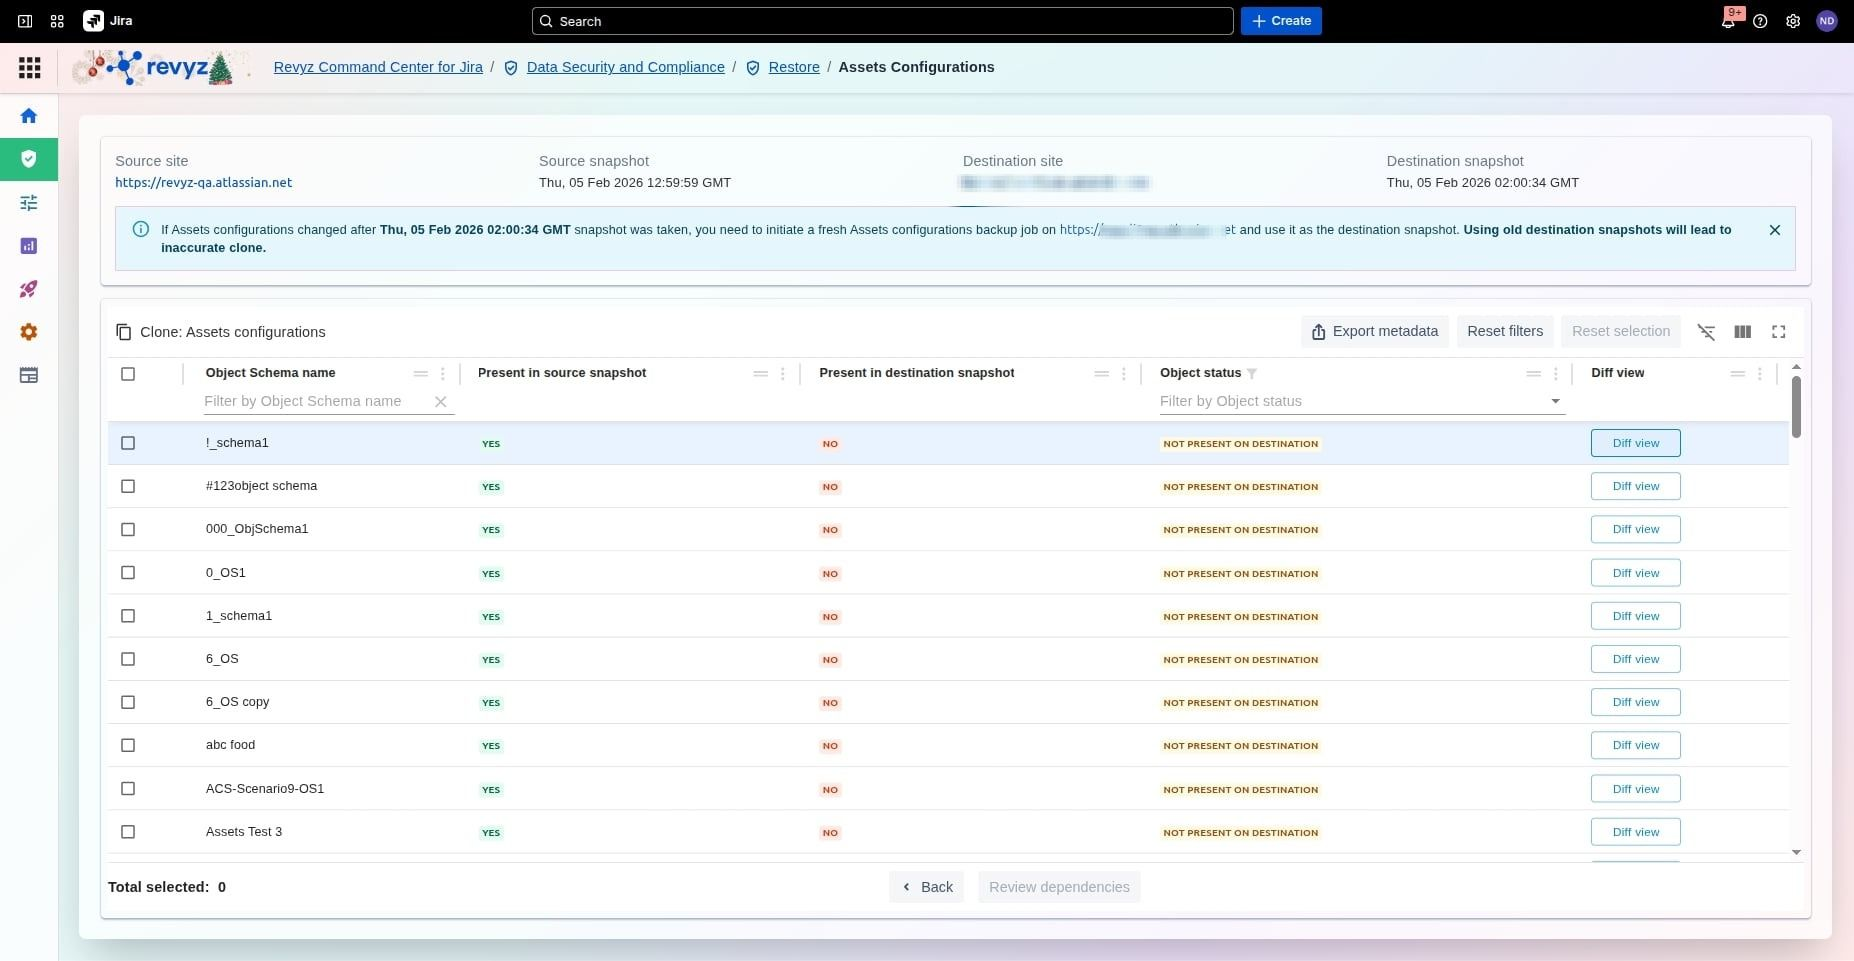
Step 3: Select Object Schemas
-
Review the list of Object Schemas available for cloning.
-
Enter the new name and key for the object schemas on the destination site (if renaming is required).
-
Click on “Review dependencies”.
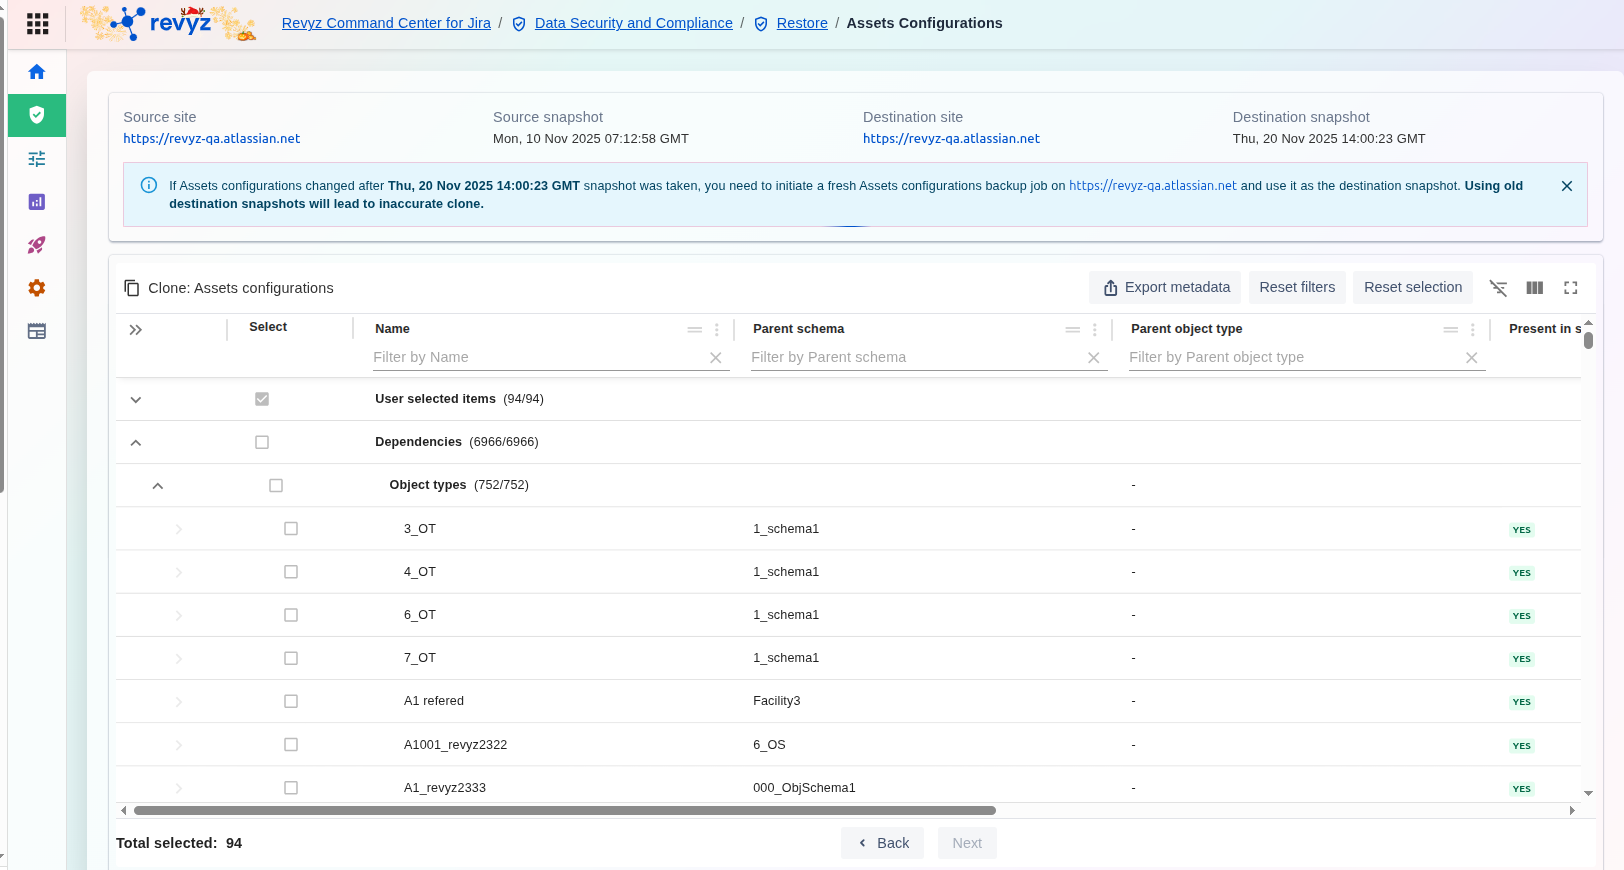
Step 4: Review Dependencies
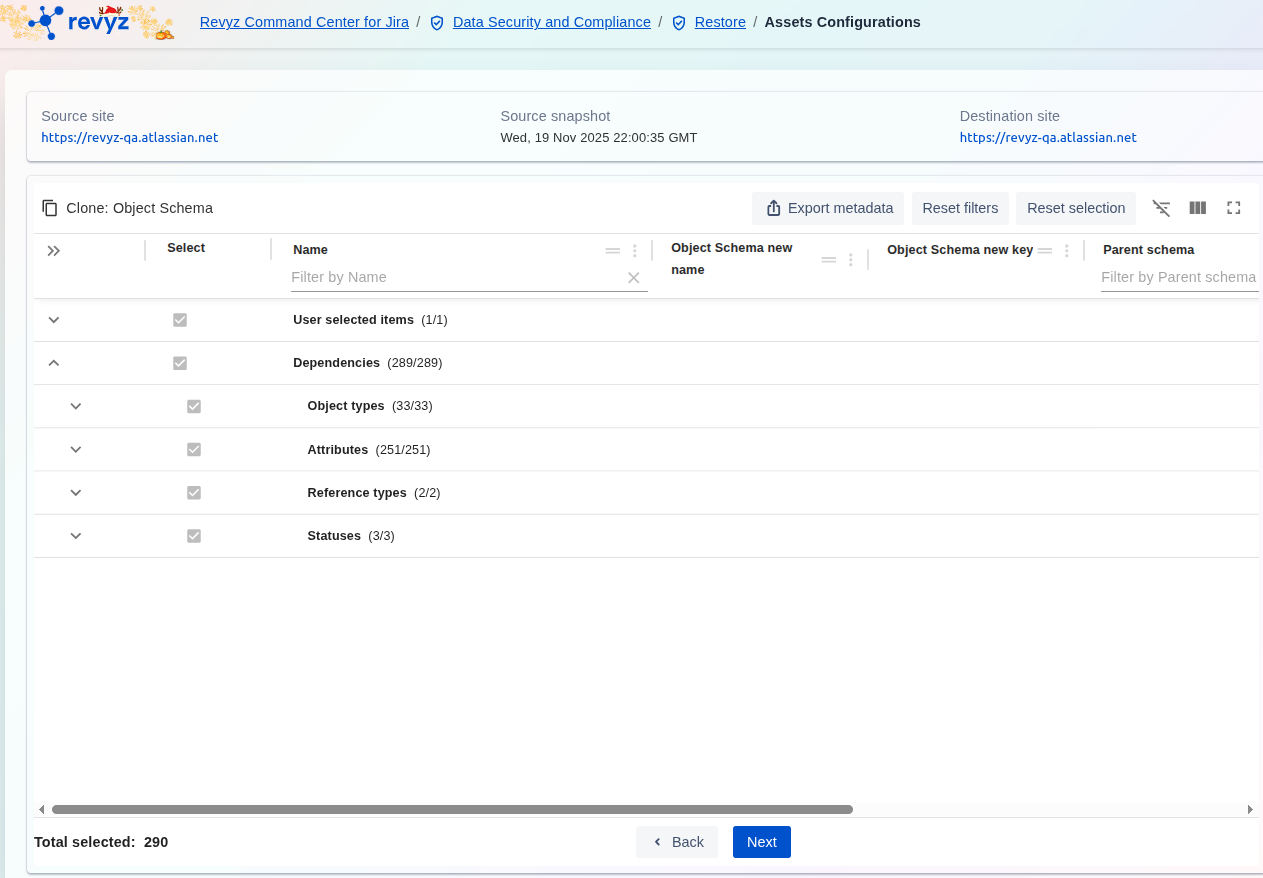
-
Review the list of underlying dependencies (e.g., attributes, references) required by the selected Object Schemas.
-
Click on “Next”.
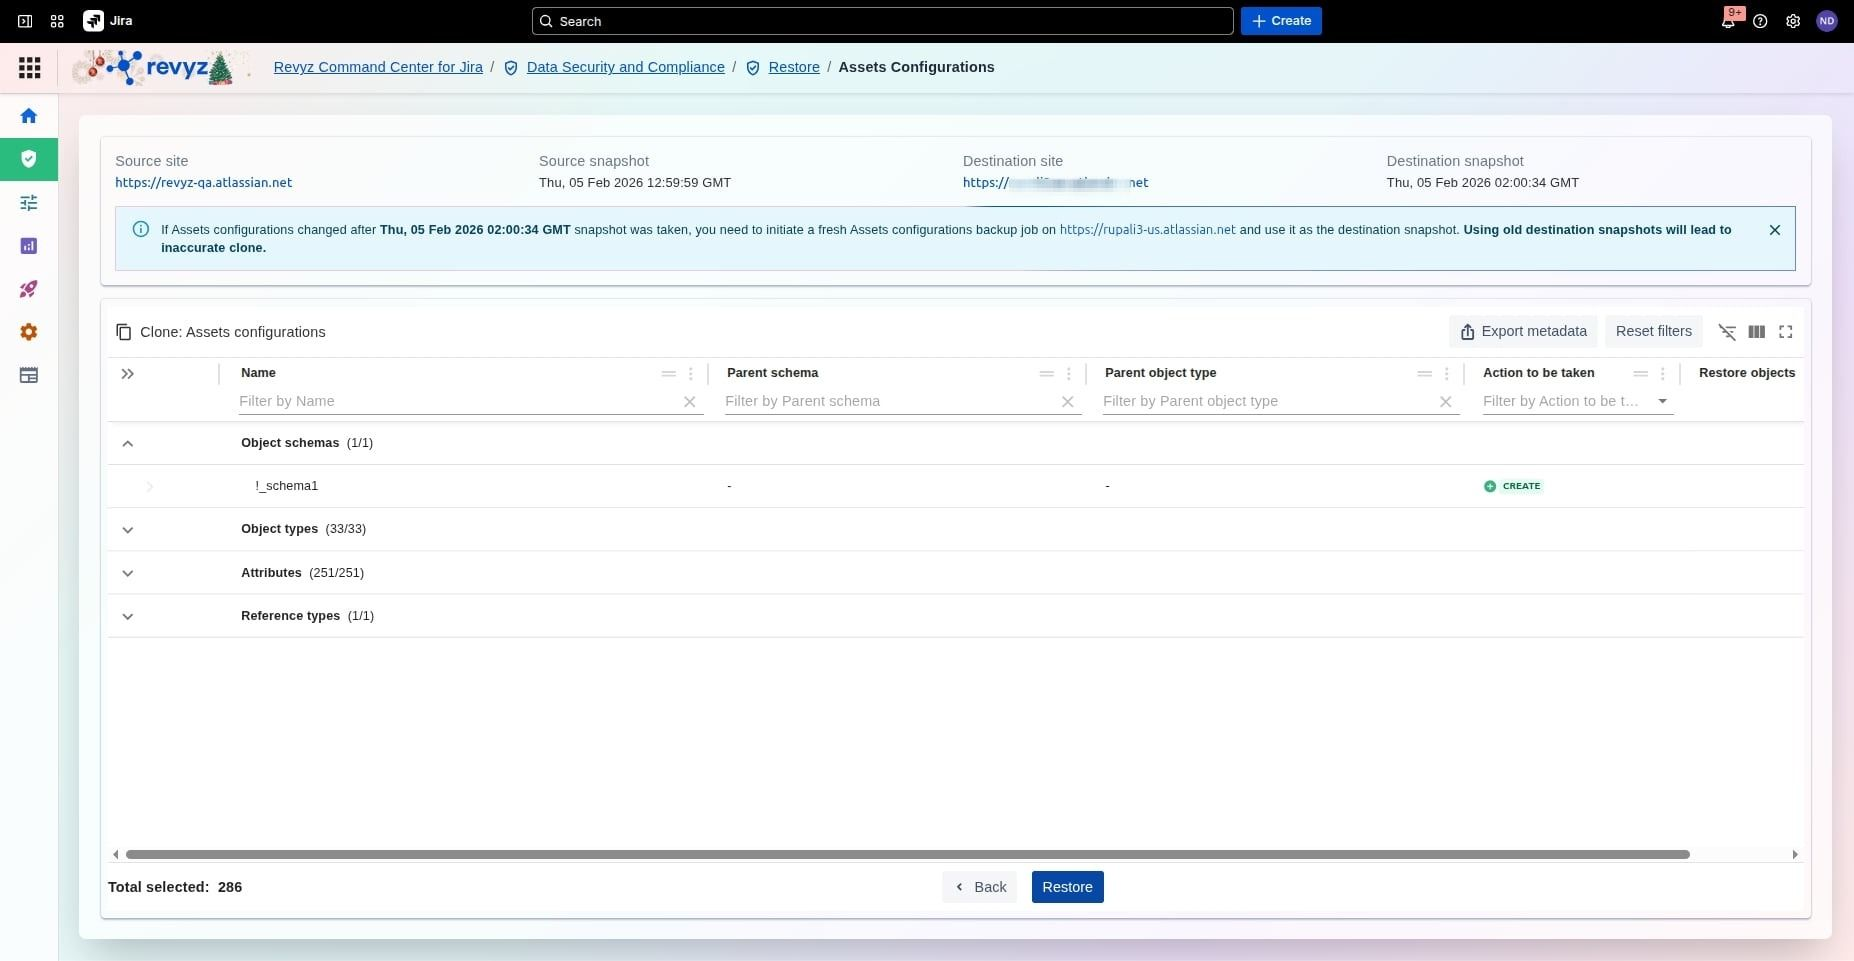
Step 6: Restore Assets Objects
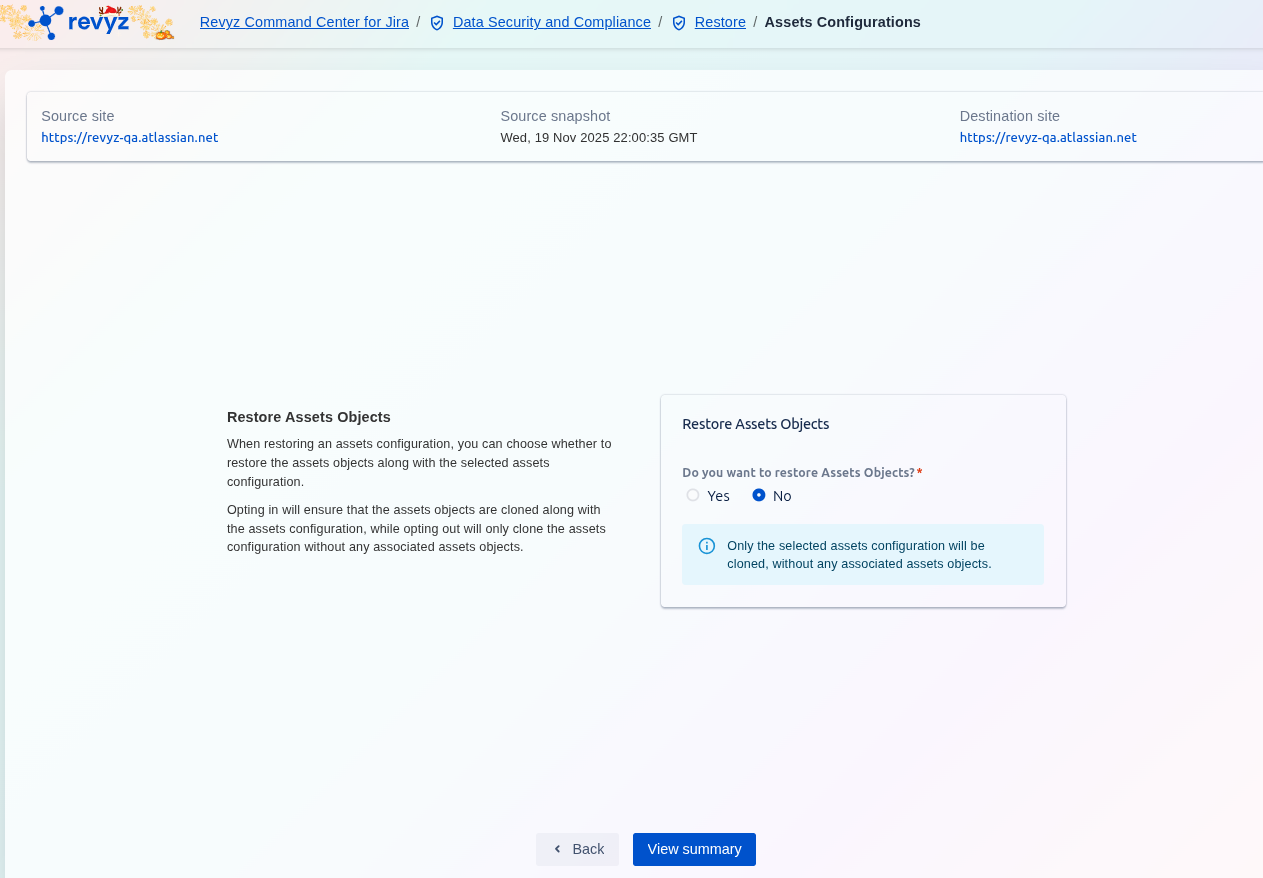
-
Determine whether you want to clone the actual Assets data by selecting Yes or No for the question: "Do you want to restore issues?"
-
Click on “View Summary”.
Step 7: Review Summary
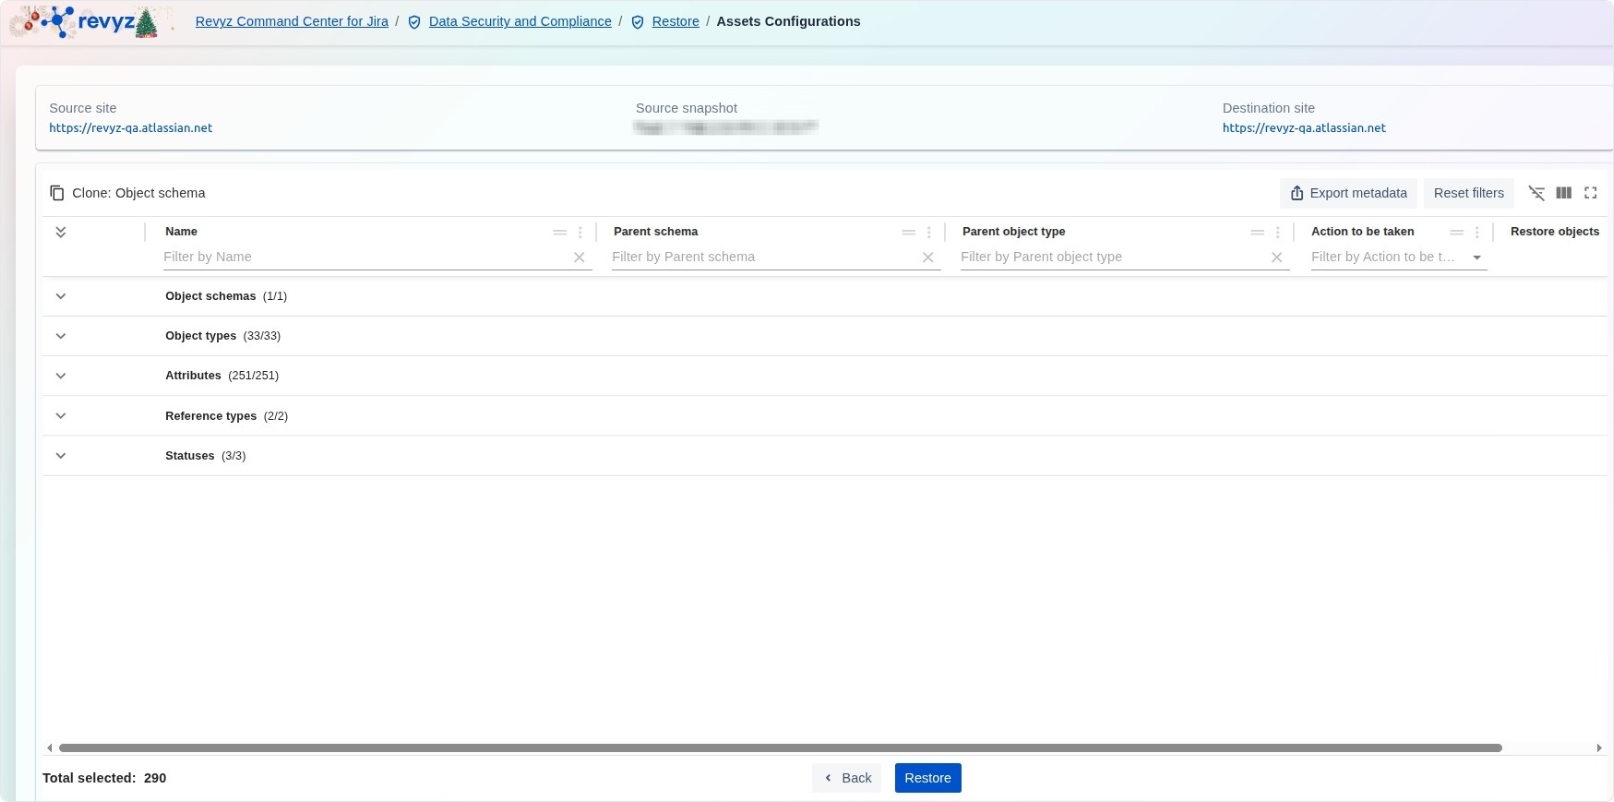
-
Review the complete summary of the clone job, including the selected configurations, dependencies, and chosen action (Create Duplicate Copy).
-
Click on “Restore” to proceed to the final confirmation.
Step 8: Completion of Cloning

-
A final confirmation modal will appear.
-
Enter the Captcha code to securely confirm and initiate the configuration replication job.
How to Restore Assets Configurations (Update)
This feature is applicable to
command Center for jira assets data manager for jira
Step 1: Enter Source Details
Select the source site and the relevant assets configuration snapshot.
Step 2: Enter the Destination Site Details
Select the destination site and enter the assets configuration snapshot. Click on View Object Schemas.
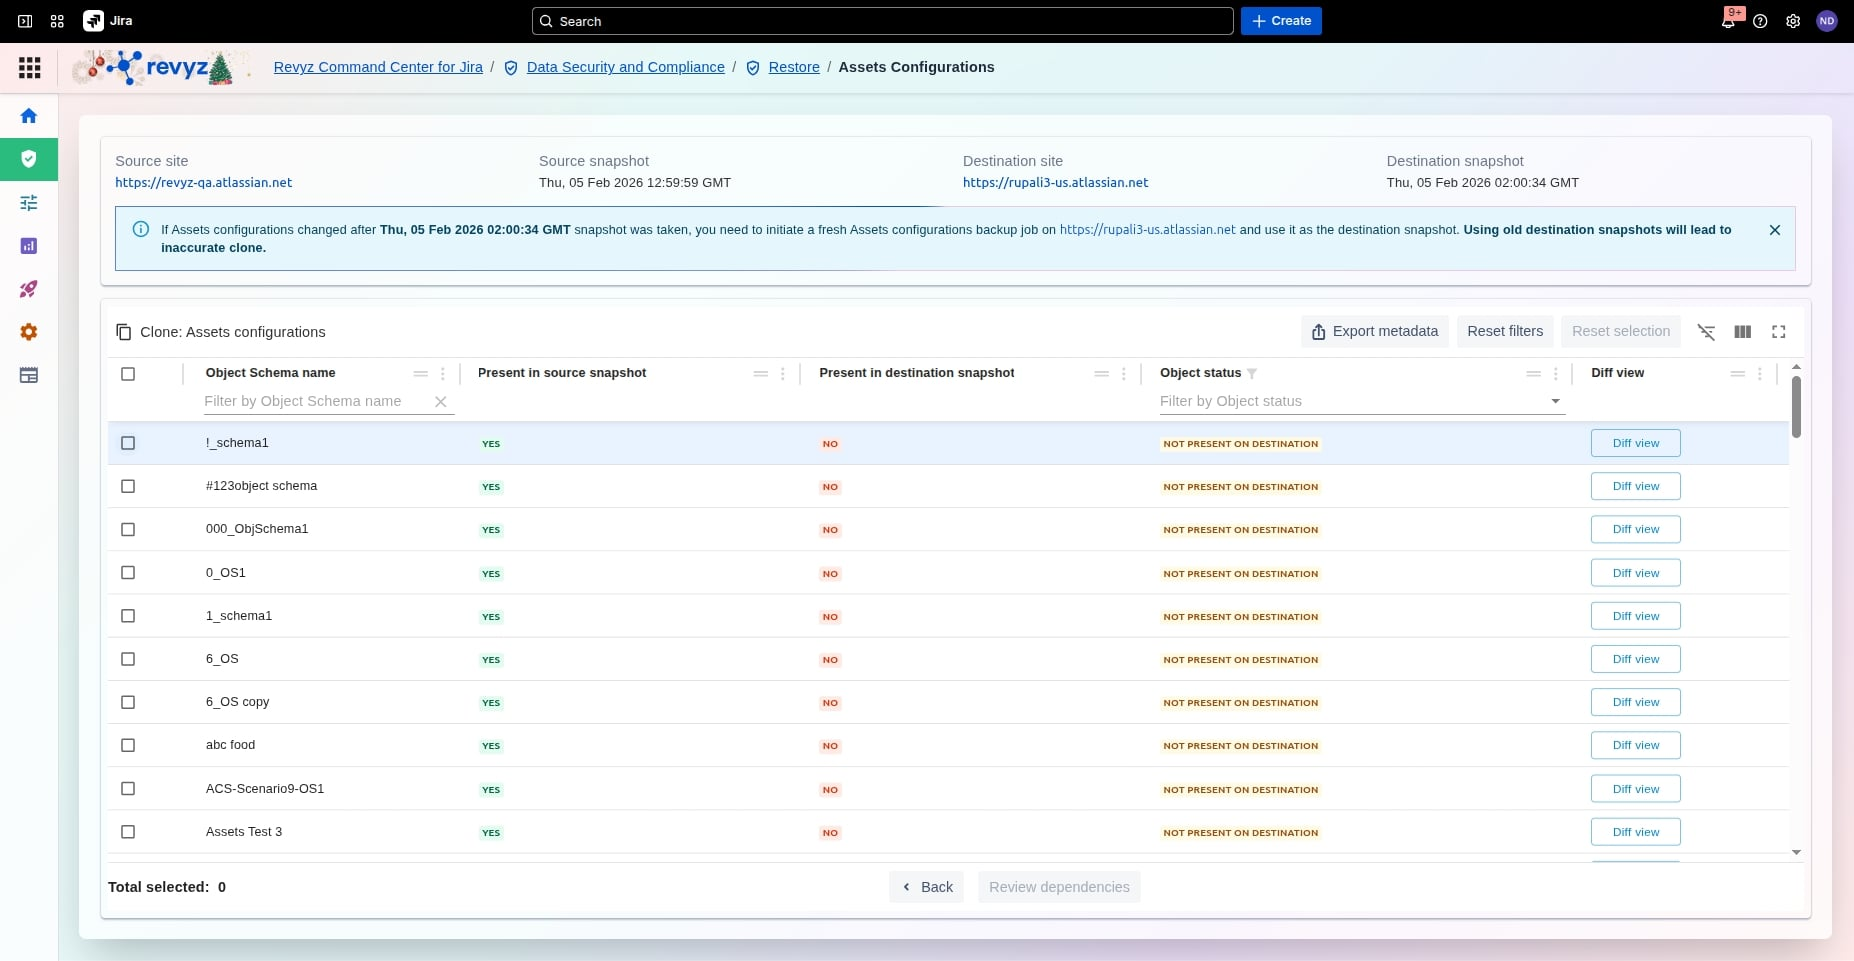
Step 3: View Object Schemas
-
Identify Missing Schemas: Check the Object Status column to see which Asset schemas exist on your source site but are missing from your destination. Items marked "Not Present on Destination" are those available for cloning.
-
Verify Snapshot Timing: Ensure the Destination Snapshot timestamp is recent. If you have changed your destination settings since that time, run a new backup first to avoid data mismatches or "stale" comparison results.
-
Check for Dependencies: Once you select your schemas, always click Review Dependencies. This ensures that any linked data, like user roles or custom fields, is included so your Assets function correctly immediately after the transfer.
Step 4: Diff View
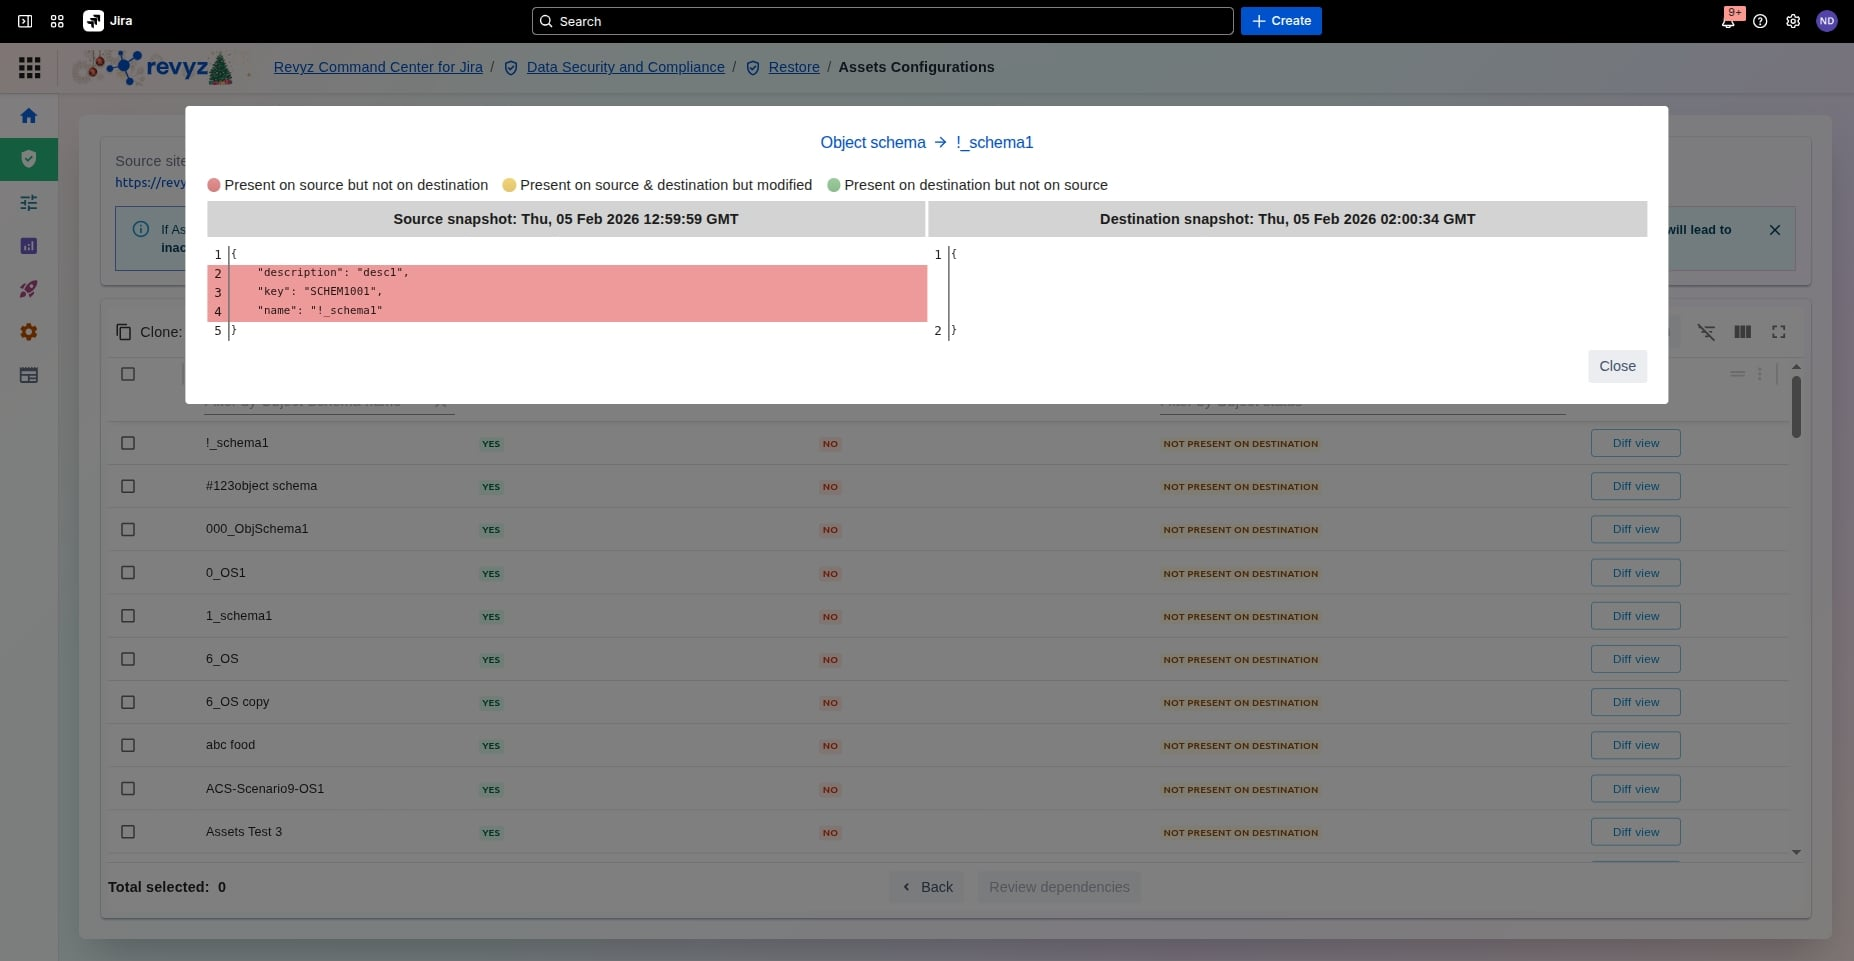
-
Compare Configuration Details: Use the Diff view to see a side-by-side comparison of the JSON configuration for a specific schema, including its description, unique key, and name.
-
Interpret Color-Coded Changes: Easily identify differences using the color legend: red indicates items present on source but not on destination, yellow highlights modified items found on both sites, and green shows items present only on the destination.
-
Review Specific Metadata: Check the line-by-line breakdown to confirm that metadata like the "key" (e.g.,
SCHEM1001) matches your expectations before finalizing the selection.
Step 5: Select Object Schemas
-
Bulk Select Schemas: Check the top-level checkbox in the table header to select all visible Object Schema names for cloning or restoration in one action.
-
Execute Dependency Review: Once all desired schemas are selected, click the Review dependencies button to identify any linked Jira configurations. like custom fields or user roles, required for a successful transfer.
Step 6: Review Dependencies
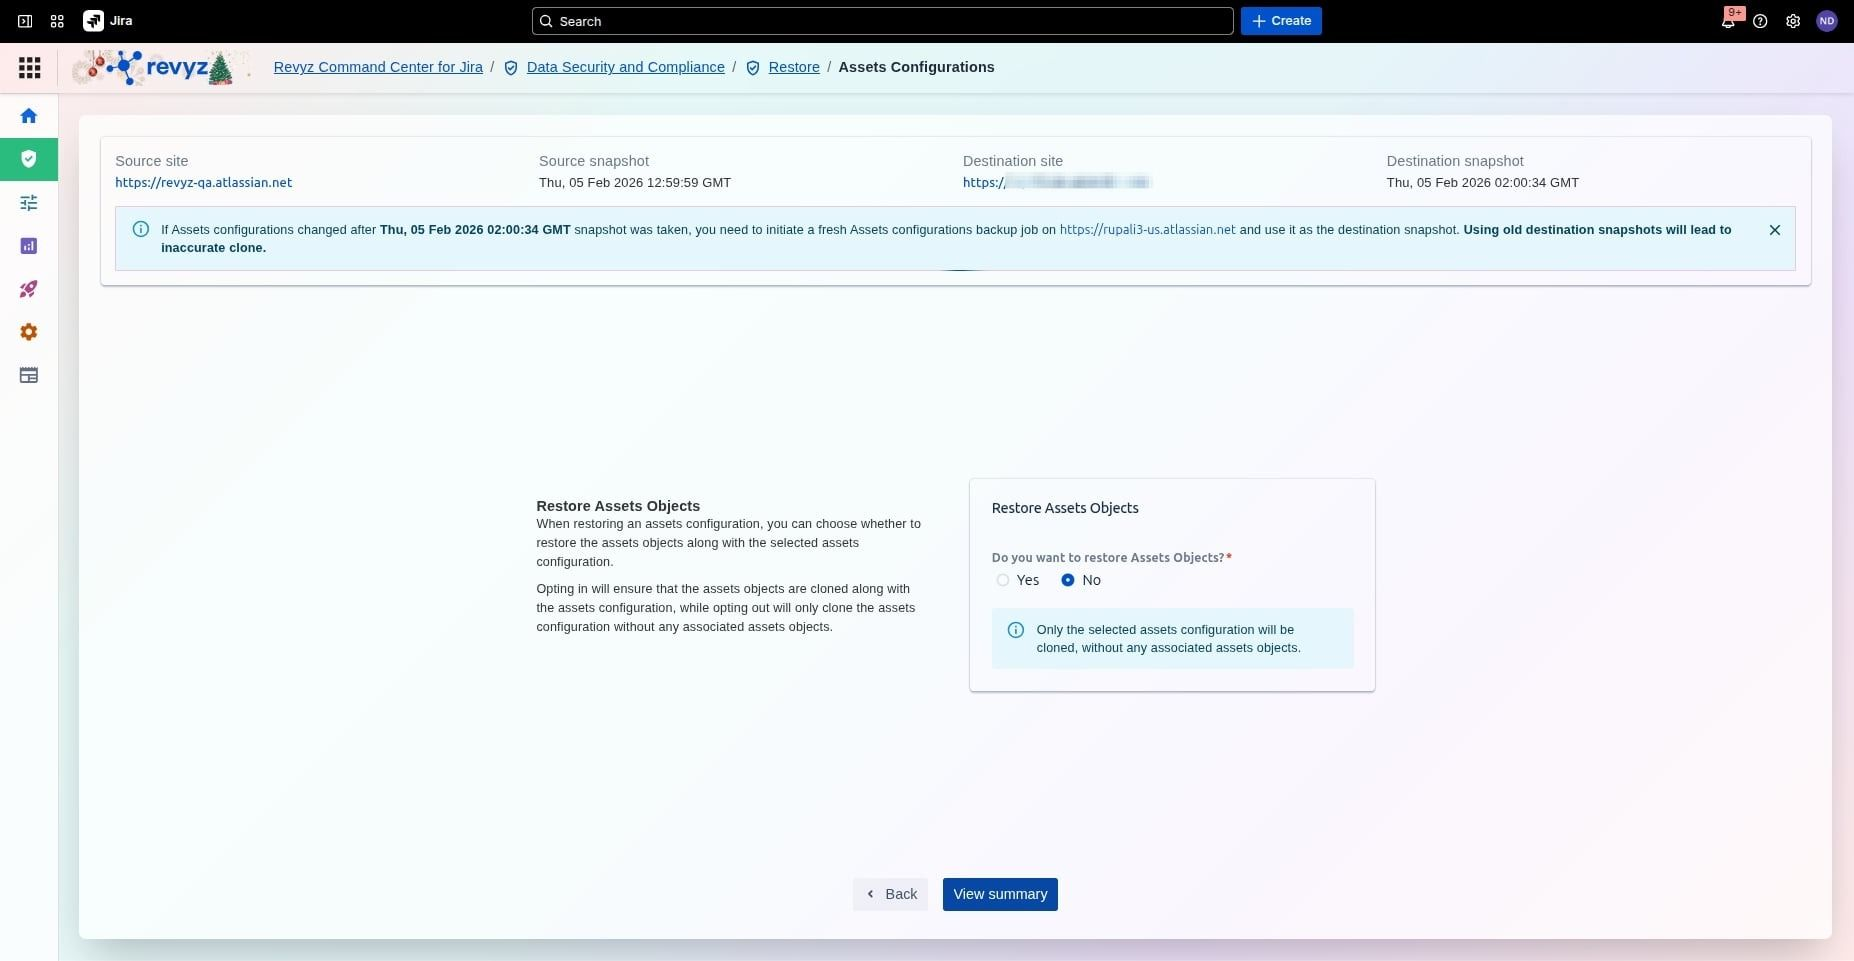
-
Choose Restoration Scope: Decide whether to include actual Assets Objects along with your selected configurations. Selecting "Yes" clones both the structure and the individual data entries, while "No" clones only the empty configuration shells.
-
Understand Selection Impact: Review the information panel to confirm that opting out of object restoration will result in the Assets configuration being cloned without any associated assets objects.
-
Finalize Before Summary: After making your choice on whether to restore objects, click the View summary button to see a full overview of your migration plan before execution.
Select the desired assets configurations and click on “Review Dependencies”. Click on the relevant filters to check the correct object statuses.
Step 7: Click on Restore
-
Confirm Global Selection: Before clicking Restore, verify the Total selected count at the bottom of the screen to ensure it matches your expected volume of configuration data. Click on “Restore”.
Step 8: Enter the CAPTCHA code
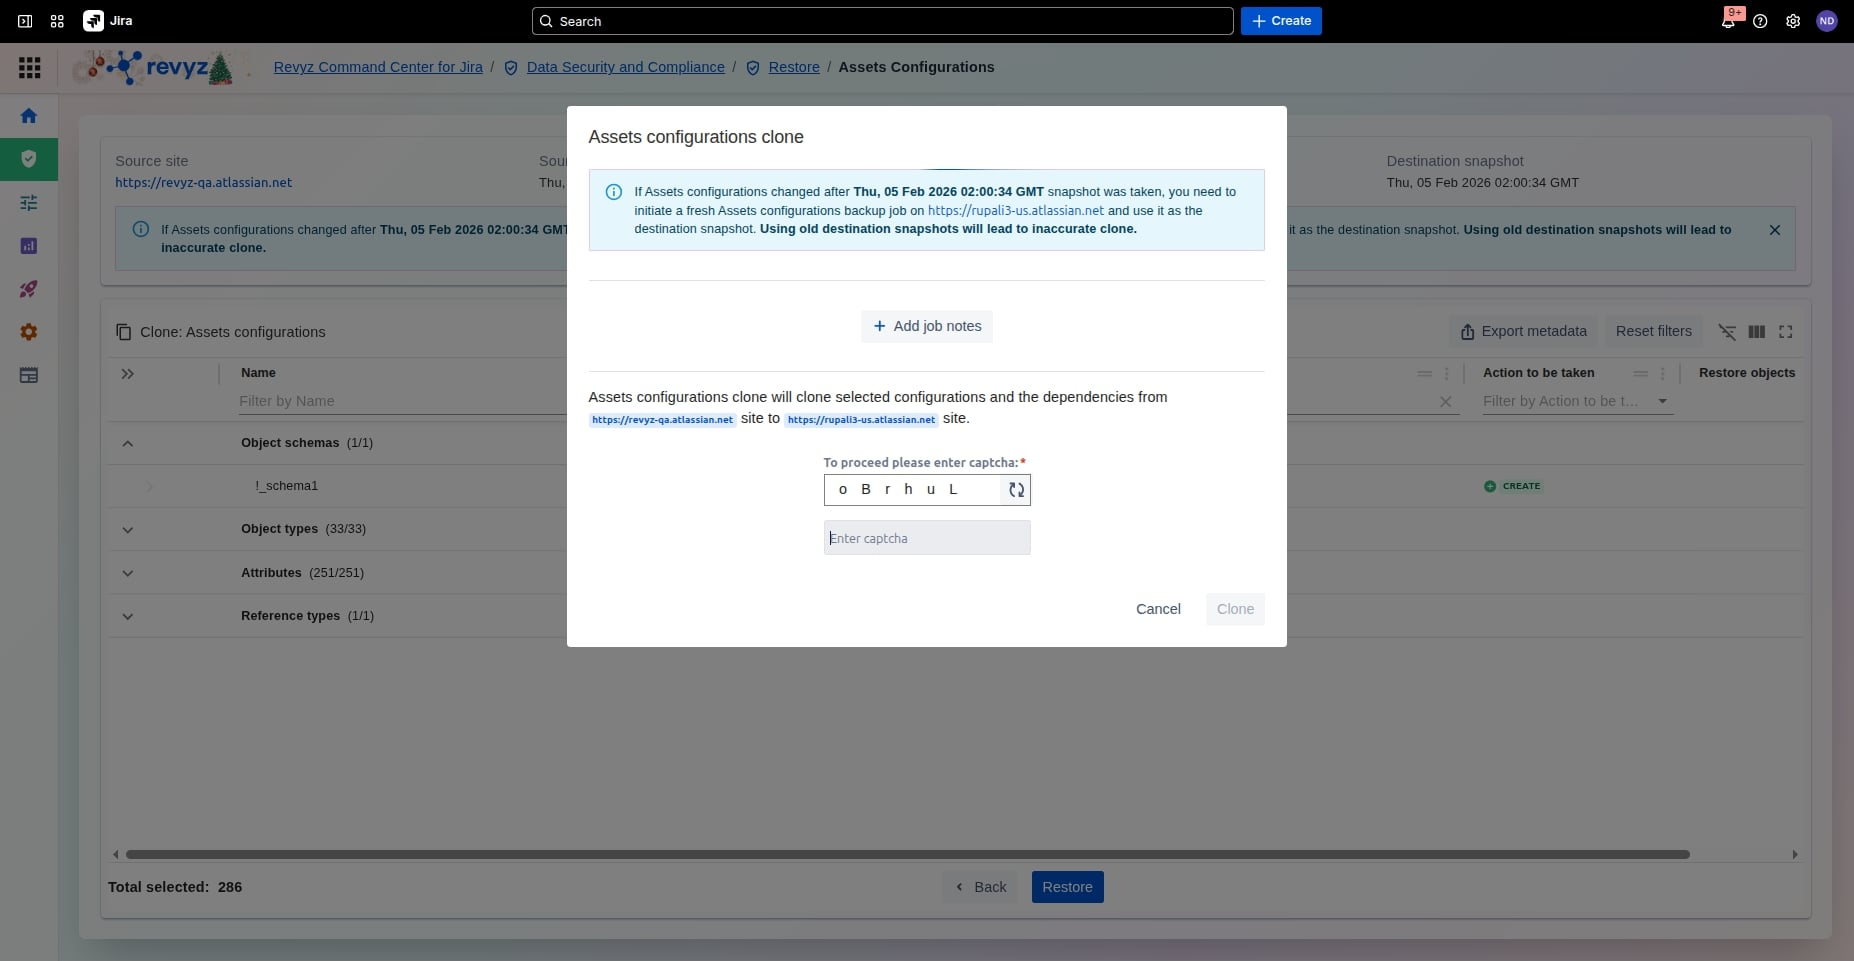
Add job notes, if required, and enter the CAPTCHA code to complete the process.