What is this feature?
-
This is the central dashboard for monitoring all background tasks and operations running within the Revyz application. It categorizes all running and completed jobs by their function, such as backups, restores, and administrative tasks.
-
Use Case: Use this dashboard to check the real-time status of any active job (like a backup or restore), review the history of completed tasks, and access detailed logs for troubleshooting or validation.
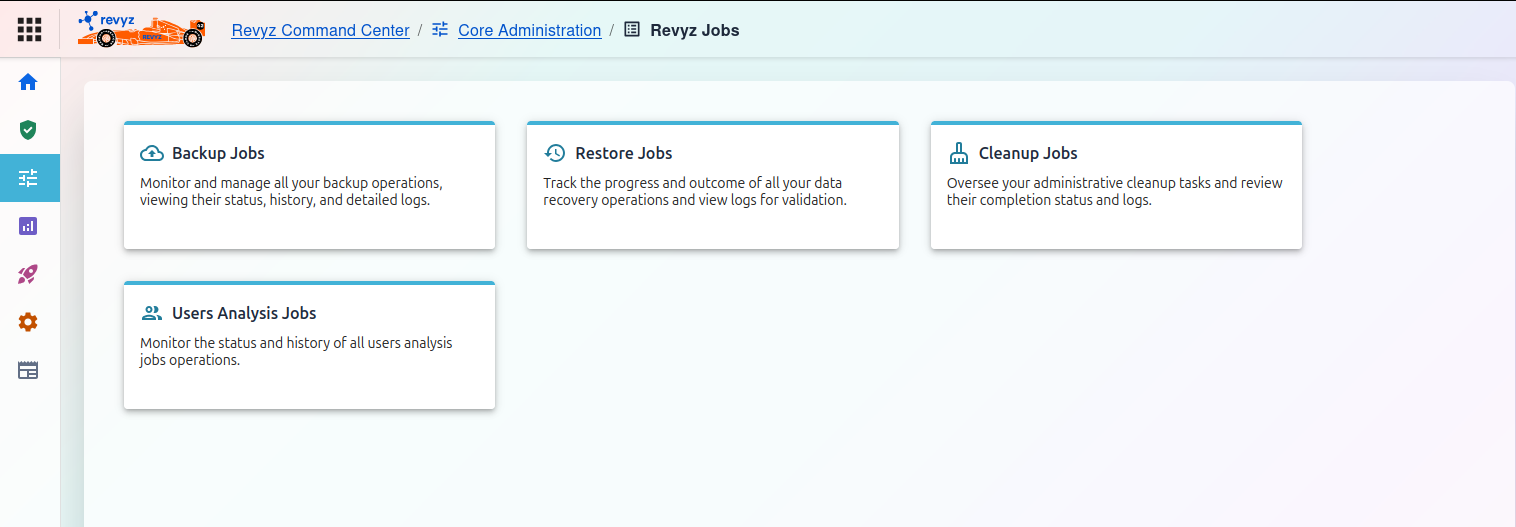
The "Revyz Jobs" dashboard is divided into the following categories:
1) Backup Jobs
Monitor and manage all your backup operations, viewing their status, history, and detailed logs. Click here to verify that your scheduled or on-demand backups have completed successfully, are still in progress, or have failed. The logs provide details for any troubleshooting.
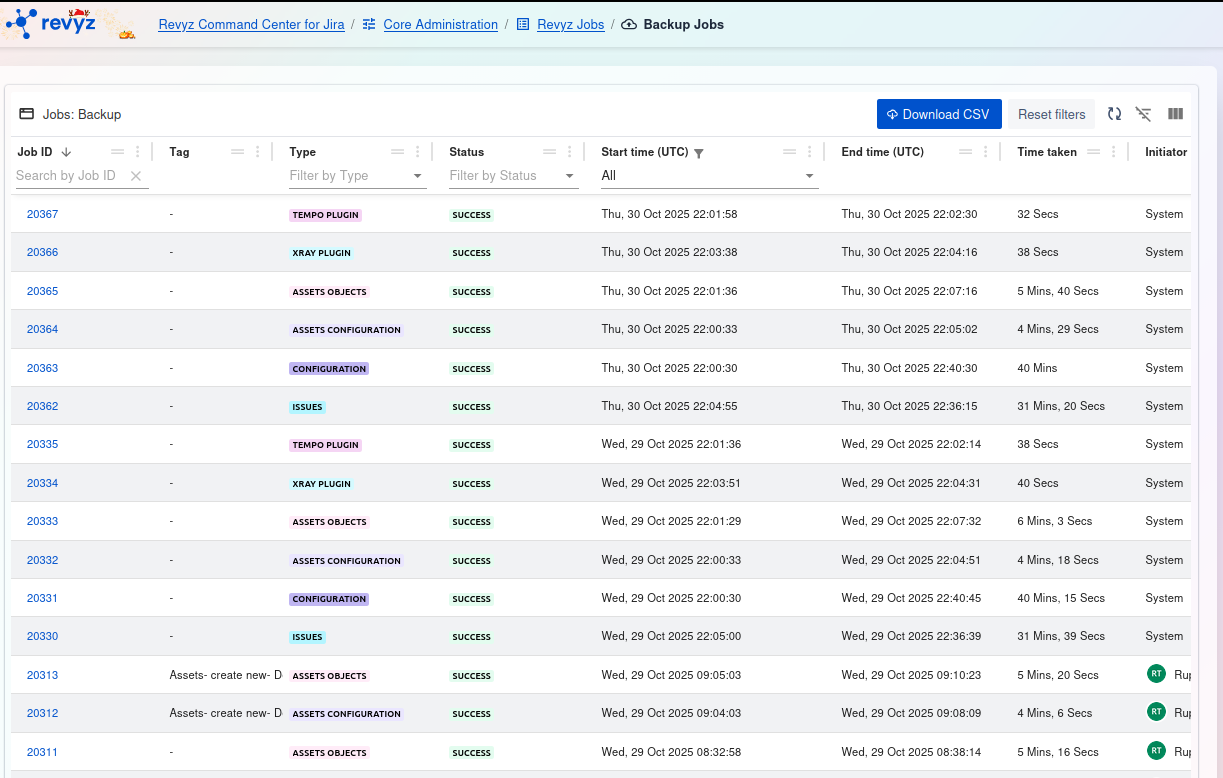
The Backup Jobs dashboard is your central audit log for all backup operations. It provides a detailed, real-time list of every job run, showing its status (SUCCESS, FAILED), duration, and what specific data (Type) was backed up.
Key Data at a Glance
-
Type: Shows what was backed up in that specific job (e.g.,ISSUES,ASSETS CONFIGURATION,XRAY PLUGIN,TEMPO PLUGIN). -
Status: The most important column.SUCCESSmeans the job completed;FAILEDmeans it needs investigation. -
Initiator: Shows who or what started the job.Systemmeans it was an automated, scheduled backup. User initials (e.g.,RT) mean it was a manually triggered job. -
Job ID: A unique, clickable link to see the detailed log and output for that specific job. -
Time taken: Useful for monitoring performance and spotting jobs that are taking an unusually long time.
How to Use This Report?
To Monitor Backup Health:
-
The simplest way to check for problems is to use the "Filter by Status" dropdown and select
FAILED. -
This instantly shows you any jobs that require investigation.
-
You can also check this screen after your scheduled backup window to confirm you have a list of
SUCCESSjobs for all your data types.
To Investigate a Specific Job:
-
Find the job you want to review (e.g., a
FAILEDjob or a manually-run job). -
Click the blue link in the
Job IDcolumn. -
This will open a detailed log output for that job, showing specific steps and any error messages.
To Export Logs for Auditing:
-
Click the
Download CSVbutton in the top-right corner. -
This exports the entire list of jobs, which can be used for compliance records, offline analysis, or performance tracking.
2) Restore Jobs
Track the progress and outcome of all your data recovery operations and view logs for validation. This is where you go to monitor an active restore (e.g., for a project, or a single issue) and to get confirmation and logs after the restore is complete.
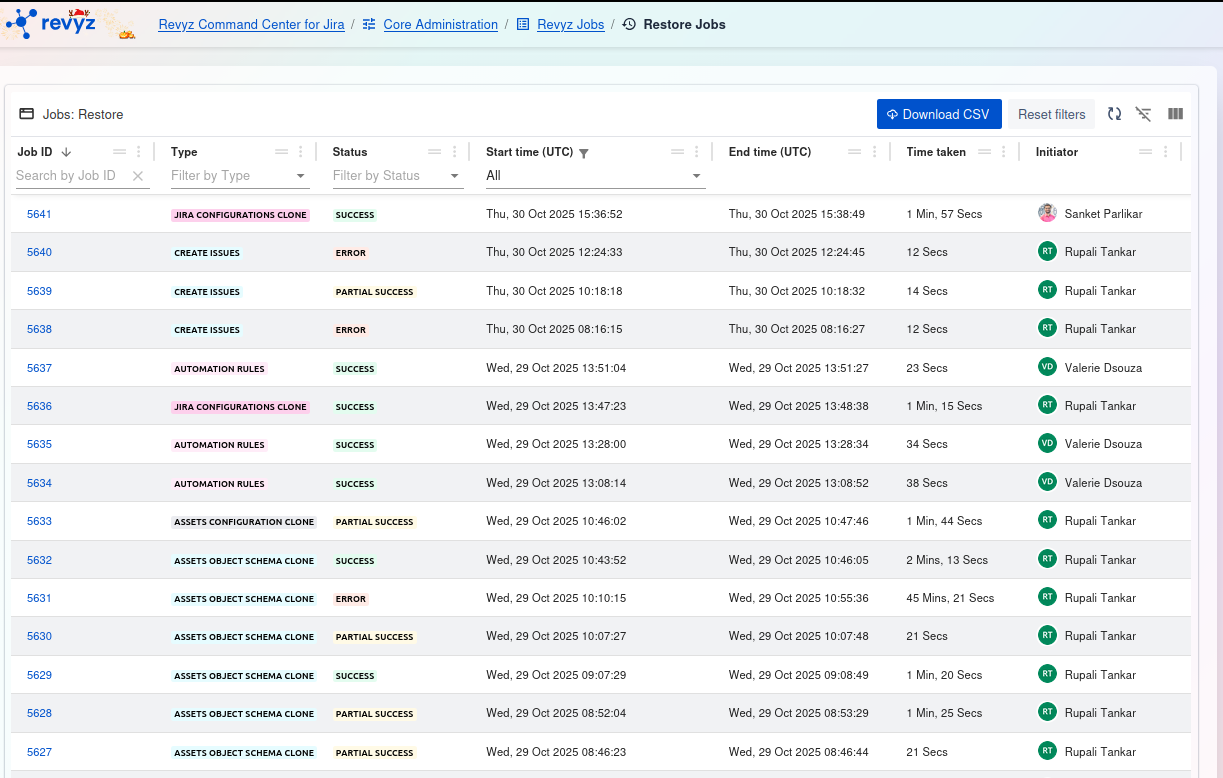
What is this feature?
The Restore Jobs dashboard is your central audit log for all data recovery and cloning operations. It provides a detailed, real-time list of every restore job run by your team, showing its status, duration, and what specific data (Type) was recovered or cloned.
Key Data at a Glance
-
Type: Shows what action was performed (e.g.,CREATE ISSUES,JIRA CONFIGURATIONS CLONE,ASSETS OBJECT SCHEMA CLONE). -
Status: The most important column.ERRORorPARTIAL SUCCESSindicates the restore did not fully complete and requires immediate investigation. -
Initiator: Shows which administrator triggered the restore job. This is critical for security and change management tracking. -
Job ID: A unique, clickable link to see the detailed log and output for that specific restore. -
Time taken: Useful for understanding how long different types of data recovery take.
How to Use This Report?
To Audit Restore Activities:
This screen is your primary tool for security and compliance. You can instantly see who (Initiator) restored what (Type) and when (Start time). This is essential for tracking all data changes and recovery events on your instance.
To Investigate a Failed Restore:
-
Use the "Filter by Status" dropdown and select
ERRORandPARTIAL SUCCESS. This immediately isolates all problematic jobs. -
Find the job you need to investigate.
-
Click the blue link in the
Job IDcolumn. This opens the detailed log output, which will contain specific error messages telling you why the job failed.
To Export Logs for Auditing:
-
Click the
Download CSVbutton in the top-right corner. -
This exports the entire list of restore jobs, which is essential for creating permanent change management records, security audits, or incident reports.
3) Cleanup Jobs
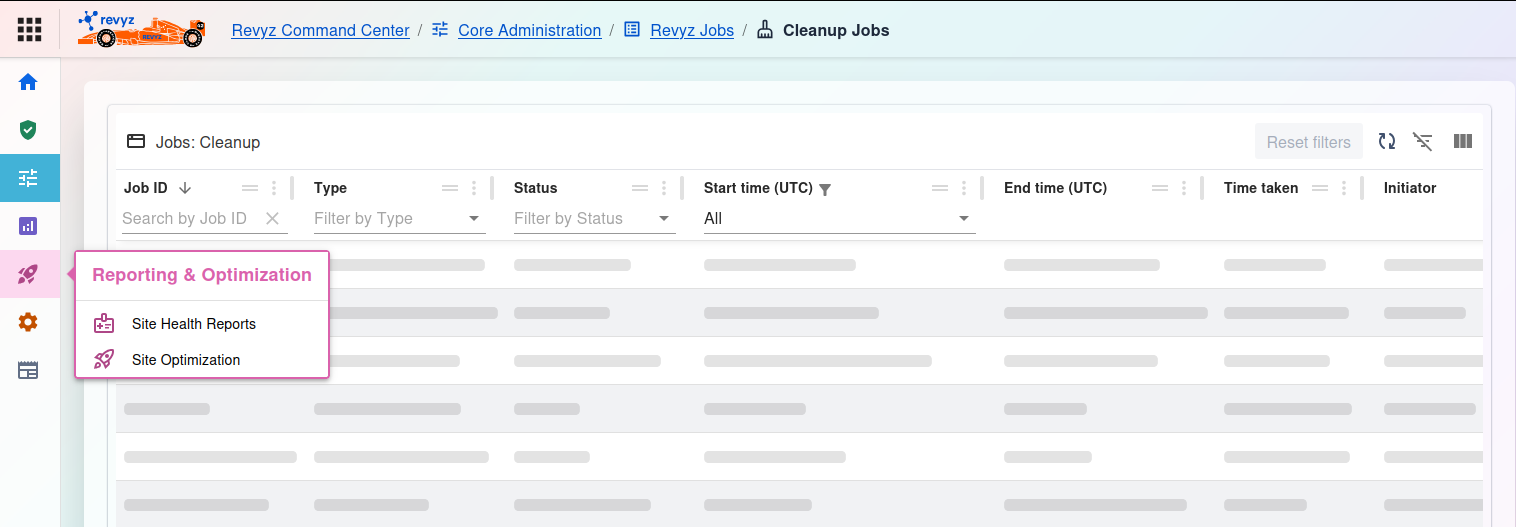
What is this feature?
The Cleanup Jobs dashboard is the central audit log for all bulk deletion operations. It tracks every job initiated from the Site Optimization section (like deleting projects, filters, or roles) and records its status and who performed the action.
Key Data at a Glance
-
Type: Shows what kind of items were deleted (e.g.,PROJECTS,FILTERS,PROJECT ROLES). -
Status: The most important column.SUCCESSconfirms the cleanup, whileERRORorPARTIAL SUCCESSmeans some items failed to delete. -
Initiator: Shows which administrator ran the cleanup job. This is critical for security and change tracking. -
Job ID: A unique, clickable link to a detailed log showing exactly which items were (or were not) deleted. -
Time taken: Shows how long the bulk deletion operation took to complete.
How to Use This Report
To Audit Cleanup Activities:
This screen is your primary tool for change management. You can instantly see who (Initiator) deleted what (Type) and when (Start time). This is essential for accountability and for investigating any accidental mass deletions.
To Investigate a Failed Cleanup:
-
Use the "Filter by Status" dropdown and select
ERRORorPARTIAL SUCCESSto find jobs that didn't complete. -
Click the blue link in the
Job IDcolumn. -
The detailed log will open, showing specific error messages and identifying which items could not be deleted (e.g., a project that was still in use).
To Export Logs for Auditing:
-
Click the
Download CSVbutton in the top-right corner. -
This exports the entire job list, creating a permanent record for compliance reports, security audits, or incident reviews.
4) Users Analysis Jobs
Monitor the status and history of all users analysis jobs operations. When you run a report from the "Users Analysis" feature, this section shows the status of that job, which is especially useful for large queries that take time to run.
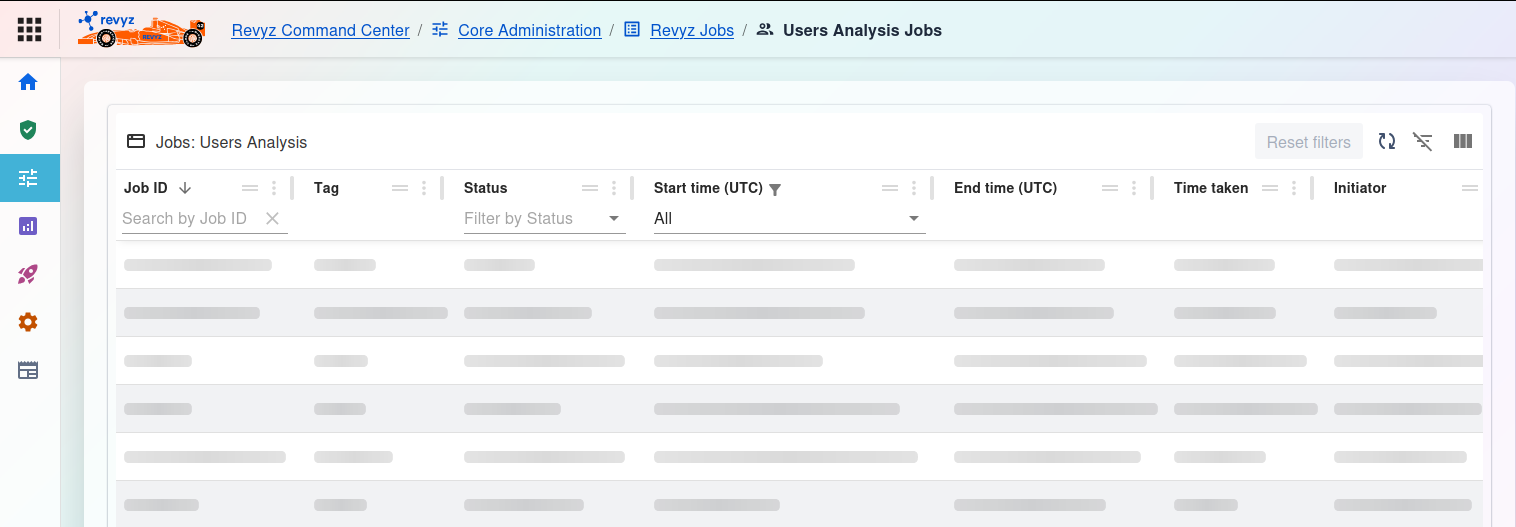
The Users Analysis Jobs dashboard is the central audit log for all user analysis tasks. It tracks every job run to analyze your user base (e.g., finding inactive users or licensing details), recording its status and who initiated it.
Key Data at a Glance
-
Status: The most important column.SUCCESSconfirms the analysis completed, whileFAILEDindicates the job could not be run. -
Initiator: Shows which administrator orSystemprocess started the analysis job. -
Job ID: A unique, clickable link to a detailed log showing the job's output and any potential errors. -
Time taken: Shows how long the analysis took, which is useful for performance monitoring on large instances. -
Tag: (If used) A custom tag to help identify or group specific analysis jobs.
To Monitor Analysis Jobs:
-
Use this screen to confirm that your scheduled or manually triggered user analyses are completing successfully.
-
Use the "Filter by Status" dropdown and select
FAILEDto quickly find any jobs that ran into errors.
To Investigate a Job:
-
Click the blue link in the
Job IDcolumn for any job you want to review (especially aFAILEDone). -
The detailed log will open, providing specific error messages or details about why the analysis could not be completed.
To Export Logs for Auditing:
-
Click the
Download CSVbutton (if available) in the top-right corner. -
This exports the entire job list, creating a permanent record for compliance or performance auditing.